


7641
4
3
2
1
8
7
6
5
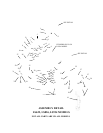
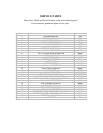
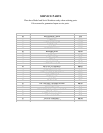
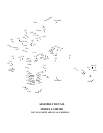
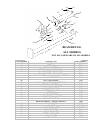
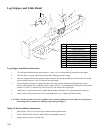
Log Stripper and Table Detail
Item # Description Part #
Log Stripper Assembly Kit 7464
1 Stripper Weldment 7444TK
2 3/8-16 Nyloc Nut NB182
3 Stripper Spacer 7449TK
4 Stripper Bracket 7448TK
5 3/8-16 X 5 1/2 GR5 ZP NB575
Splitter Table Accessory Kit 7626
6 5/16-18 X 3/4 HCC GR2 ZP Bolt NB143
7 Splitter Table 7621TK
8 5/16-18 ZP 2 Way Lock Nut NB558
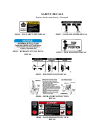
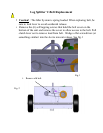
1. Turn off engine and disconnect spark plug wire. Place wire so it cannot make a connection to the engine.
2. Check to make sure parts and hardware match Bill of Materials (Parts Listing).
3. Place the Stripper Bracket (#4) around cylinder as shown. Be sure the notched area of the bracket fits around
the hose fitting extrusion. This will stabilize the Log Stripper.
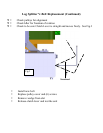
4. Fit the Stripper Weldment (#1) against the other side of the cylinder, temporary aligning the holes of the
bracket with the holes of the weldment. Make sure the “STOP” is resting against the front area of the cylinder
and the “FLANGE” is under the lip of the beam. This will stabilize the Log Stripper.
5. Add Spacer (#3), place between the cylinder and the Stripper Weldment (#1), aligning the holes at the top.
6. Insert 4 bolts as shown and secure with corresponding Nyloc nuts. Tighten and check stability.
CAUTION! Test the operation of your Log Splitter before actually splitting any wood. Make sure NO parts are
interfering with one another (i.e. splitting wedge and Log Stripper.)
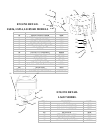
1. Place Splitter Table (#7) on top of angle welded on side of splitter beam.
2. Install 3 NB143 Bolts (#6) and 3 NB558 Nuts (#8) and tighten securely.
3. Repeat steps one and two for other side.
Log Stripper Installation Instructions
Splitter Table Installation Instructions