


26
ENGLISH
EN
4 CONTROLS
The snow thrower is fitted with the following controls and
devices.
See fig. 9-12.
Starting handle (1) – Starts and stops the electric motor.
Ignition lock (2) – Facilitates activation of the starting han-
dle.
Connector (3) – For electrical connection.
Cable support (4) – For supporting the connection cable.
Deflector lock (5) – Locks the deflector in position.
Direction lever (6)– Changes the direction of the discharge
chute.
Discharge chute (A) – Ejects the snow.
Deflector (B) – Determines the distance the snow is thrown.
5 USING THE MACHINE
5.1 GENERAL
Never start the engine until all the above measures under
‘ASSEMBLY’ have been carried out.
Never use the snow thrower without first reading
and understanding the enclosed instructions and
all the warning and instruction stickers on the
snow thrower and in these instructions.
Always wear protective goggles or a visor during
use, maintenance and service.
5.2BEFORE STARTING
The connection cable and its plugs must be fault
free and approved for outdoor use.
The connection cable may only be connected to
power sockets equipped with an earth leakage cir-
cuit breaker with a trip current of max. 30 mA.
The connection cable must be suspended on the ca-
ble support. Otherwise there is a risk of damage
alongside the plug which is potentially life-threat-
ening.
Connect the snow thrower with the electric cable from the
property’s power socket.
Suspend the cable on the cable support (4) and connect to the
connector (3). See fig. 9.
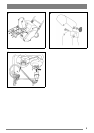
5.3 START
Start the motor and the auger as described below.
See fig. 1.
1. Lean the snow thrower back slightly so that the auger is
raised a little above the ground.
2. Press in and hold the button (2) . Squeeze the handle (1).
3. Release the ignition lock, lower the auger towards the
ground and start to clear the snow.
5.4 STOP
Stop the motor and the auger by releasing the
starting handle (1). See fig. 1.
5.5 SNOW CLEARANCE
See fig. 1.
Never aim the snow at bystanders.
Always stop the engine before unclogging.
Always wear eye protection when operating the
snow thrower.
If the auger is blocked, never try to keep the motor
engaged for more than 20 seconds. Extensive en-
gagement will damage the motor.
1. Start the motor as described above and check the ejection
distance and direction.
2. If necessary, stop the motor and adjust the deflector (B).
Upwards gives a longer throwing distance and down-
wards gives a shorter throwing distance. Lock the deflec-
tor in position using the knob (5).
3. If necessary, stop the motor and adjust the discharge
chute (A) with the lever (6) so that the snow is ejected in
the desired direction.
4. Stop working by releasing the starting handle (1).
5. Any unclogging can easily be carried out with a piece of
wood or similar after the engine has stopped.
The snow thrower is propelled automatically with the aid of
the auger. To facilitate propulsion, raise the handlebar a little.
Do not push the snow thrower.
5.5.1 Dry and normal snow
Snow up to 20 cm deep can be removed quickly and easily
by clearing at an even speed. Plan for downwind discharge of
the snow.
5.5.2 Wet, packed snow
Drive slowly forward. If the wet, packed snow blocks the dis-
charge chute, back up and jab a little way into the snow a few
times to clear the deflector.
5.6 AFTER USE
The snow thrower must never be rinsed with wa-
ter. Risk of damage to the electrical system and
risk of electric shocks.
1. Stop the motor.
2. Disconnect the electric cable from the snow thrower and
the property’s power socket.
3. Allow the snow thrower to cool for 30 minutes.
4. Clean the inside and outside of the snow thrower with a
suitable brush.
5. Check that there are no damaged or loose parts. Repair/
replace parts if necessary.