


25
ENGLISH
EN
• Always make sure the rotating parts have stopped and all
the controls are disengaged before cleaning, repairing or
inspection.
• Before leaving the machine unattended, disengage all the
controls, put it into neutral gear, stop the engine and
remove the ignition key.
• Never run the engine indoors except when taking it in and
out of its place of storage. In this case ensure the door to
the storage place is open. Exhaust fumes are toxic.
• Never drive across a slope. Move from the top down, and
from the bottom to the top. Be careful when changing
direction on a slope. Avoid steep slopes.
• Never operate the machine with insufficient protection or
without the safety devices in place.
• Existing safety devices must not be disconnected or
disengaged.
• Do not alter the engine’s regulator setting and do not race
the engine. The possibility of personal injury increases
when the engine is run at high revs.
• Never use the snow thrower near enclosures, cars,
windowpanes, slopes etc. without properly setting the
discharge chute deflector.
• Always keep children away from areas to be cleared. Get
another adult to keep the children under supervision.
• Do not overload the machine by driving it too fast.
• Take care when reversing. Look behind you before and
during reversing to check for any obstacles.
• Never point the discharge chute towards bystanders. Do
not allow anyone to stand in front of the machine.
• Disengage the auger when the snow thrower is to be
transported or is not in use Do not drive too fast on
slippery surfaces when transporting.
• Only use accessories that are approved by the machine’s
manufacturer.
• Never drive the snow thrower in bad visibility or without
satisfactory lighting.
• Always ensure you have a good balance and a tight grip
on the handle.
• Never use the snow thrower on a roof.
• Do not touch engine components because they are warm
during use. Risk of burn injuries.
2.4 MAINTENANCE AND STORAGE
• Tighten all nuts and screws so that the machine is in safe
working condition. Check the shear bolts regularly.
• Always use genuine spare parts. Non-genuine spare parts
can entail a risk of injury, even if they fit the machine.
• Never store the machine with petrol in the tank in
buildings where the fumes can come into contact with
open flames or sparks.
• Allow the engine to cool before putting the machine in
store.
• Before a long storage, check the instructions for
recommendations.
• Replace damaged warning and instruction stickers.
• Let the engine run a couple of minutes with the auger
connected after use. This prevents the auger from
freezing solid.
3 ASSEMBLY
3.1 UNPACKING
1. Open the packing and take out all parts.
2. Check that all parts are supplied. The parts are as follows:
• Lower part of the handle
• Upper part of the handle
• Start control
• Cable holder
• Six black knobs.
• Four long screws with square fittings.
• Two short screws with square fittings.
• Four screws with washers for the chute attachment.
• Chute attachment.
• Ratchet with springs for the chute.
• Chute.
• Two plane washers for the deflector.
• Deflector.
• Cable holders
• Two clamps for fixing of the cable.
• Two screws for the start control.
3. If anything is missing or damaged, take immediately
contact with the supplier.
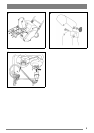
3.2 HANDLE
3.2.1 Lower part of the handle
See fig. 2.
Assemble the lower part of the handle with two knobs and
two long screws with square fittings.
3.2.2 Upper part of the handle
See fig. 3.
Assemble the cable holder (4) to the upper part of the handle.
Assemble the upper part of the handle on the lower part of the
handle. Fix with two long screws with square fittings and two
knobs.
3.2.3 Start control
See fig. 4.
Assemble the start control (1) on the upper part of the handle.
Secure the cable to the handle with two clamps (C).
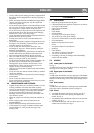
3.2.4 Chute
1. Assemble the ratchet with the two springs. See fig. 5.
2. Assemble the chute in the opening and against the
ratchet. See fig. 6.
3. Assemble the chute attachment with four screws and four
washers. See fig. 7.
4. Assemble the deflector with two short screws, two
washers and two knobs. See fig. 8.