


ENGLISH
GB
• Always keep the mower battery away from wa-
ter, sources of heat (ovens, radiators, open fires,
etc.) and hazardous chemicals.
• Always use the accompanying genuine Stiga
charger. Never use the charger for any other
product.
• Never use the charger if it is damaged in any way.
A damaged lead or charger should immediately
be replaced at an authorised service workshop
• Take care of the leads. Never carry the charger
by the lead. When charging is complete pull out
the plug not the lead. If an extension cable is
used, use a robust sort suitable for outdoor use,
even if the battery is never charged outdoors.
• The charger always feels warm to touch, during
the first hours of charging.
CHARGING BEFORE WINTER
STORAGE
The battery should always be stored ful-
ly charged.
1. Take the battery out of the mower.
2. Carefully wipe off the battery.
3. Store the battery outside of the mower in a dry
and cool place.
USING THE MOWER
STARTING/STOPPING THE MOWER
Keep hands and feet well away from the
rotating blade(s). Never put your hand
or foot under the blade casing or in the
grass ejector unit while the motor is
running.
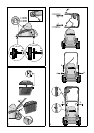
1. Fix the battery in place in the mower (fig. 6).
2. Insert the safety key into the control panel (fig.
7). When the safety key is in place, the green
lamp will be lit. If it is not, check that the engine
protection on the safety key is pressed in (fig. 8)
and that the battery is fully charged.
3. Press down the handle to lift the front wheels off
the grass, thereby reducing grass resistance in the
starting moment.
4. Press in the power on/off button 1 (fig. 9). Start
the engine by pressing in the safety handle 2.To
stop, release the safety handle.
After finishing mowing:
1. Remove the safety key and keep it out of reach
of children.
2. Clean the mower (see the “Maintenance” sec-
tion under the heading “Cleaning”).
3. Recharge the battery once it has cooled down
(after about 30 minutes).
If the safety handle has stopped work-
ing, remove the safety key and take the
mower to an authorised service work-
shop to be repaired.
CONTROL PANEL (fig. 5)
The control panel has the following functions:
1. It includes the socket for the safety key. The safe-
ty key also has an in-built engine protection. If
the engine protection has been activated, remove
the safety key and reset the engine protection
(fig.8).
2. It includes three lamps which indicate the bat-
tery’s charge level:
A Green = the battery is charged to between 30%
and 100% of full capacity.
CHARGING INSTRUCTIONS
The battery must always be charged
directly after finishing mowing and as
soon as it has cooled down (after
about 30 minutes).
1. Charge the battery outside of the mower in a
dry and cool place.
2. First connect the round plug from the charger to
the battery (fig. 4).
3. Then connect the charger to a wall socket
(~220/230V).
4. Charge for 1 - 2 days, depending on how long
the machine has been used. Whilst the battery
ischarging,theredcharginglamponthebat-
tery is continuously lit, for as long as the bat-
tery charger is connected
5. Finish charging by firstly pulling out the plug
from the wall socket.
If the charger is first removed from
the battery, the plug leads can short-
circuitiftheycomeintocontactwith
conductive material.