


ENGLISH
GB
2. REAR EJECTION
Use the machine without the plug. The grass is re-
leased in a line behind the cutting deck without be-
ing mulched.
CUTTING HEIGHT
The cutting height can be varied from 25 to 90 mm.
- item no. 13-2936 has a number of fixed posi-
tions for the cutting height.
- item no. 13-2937 has continuously-variable set-
ting of the cutting height.
Note: Stated cutting heights apply when the ma-
chine is on a firm surface.
CUTTING TIPS
For optimum “Multiclip effect”, follow these tips:
- cut frequently.
- run the engine at full revs.
- keep the underside of the cutting deck clean.
- use sharp blades.
- do not cut wet grass.
- cut twice (with different cutting heights) if the
grass is long.
MAINTENANCE
PREPARATIONS
Unless otherwise stated, all service and mainte-
nance must be carried out on a stationary machine
when the engine is not running.
Prevent the machine from rolling by al-
ways applying the parking brake.
Prevent unintentional starting of the
engine by disengaging the drive, shut-
ting off the engine and disconnecting
the spark plug cable or removing the
starter key.
CLEANING
After each use, the underside of the cutting deck
should be rinsed off. This is carried out most easily
with the machine in the washing position.
WASHING POSITION
1. Set the lowest cutting height.
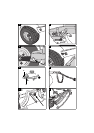
2. Undo both pins (fig. 2).
3. Grip the deck’s frame.
4. Fold up the deck so that it is pointing diagonally
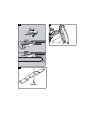
upwards and hook the S-hook into the loop on the
cutting deck (fig. 8).
If the grass has dried solid, scrape clean the under-
side.
If necessary, touch up the underside with paint to
prevent corrosion.
MAINTENANCE TIPS
In order to install/remove the Multiclip plug and to
facilitate maintenance, the cutting deck can be
folded up into the service position.
SERVICE POSITION
1.Set the maximum cutting height.
2. Undo both pins (fig. 2).
3. Hook the belt idler arm on the mount (fig. 7)
4. Force the belt off the centre pulley (fig. 7).
5. 13-2937:
Disconnect the electrical contact for the cutting
height setting.
6. Grip the deck’s frame.
7. Fold up the deck until it is upright on the rear
support plates (fig. 10).
BLADES
Use protective gloves when changing
blades to avoid cutting yourself.
Ensure that the blades are always sharp. This pro-
duces the best cutting results.
Always check the blades after a collision. If the
blade system has been damaged, defective parts
should be replaced.
Always use genuine spare parts. Non-
genuine spare parts can entail a risk of
injury, even if they fit the machine.
Install the blade so that the stamped logo is facing
down, towards the grass. Tighten the screws prop-
erly (fig. 11). Tightening torque: 24 Nm.
PIVOT WHEELS
The pivot wheels are equipped with grease nipples
on the pivot axle and the wheel axle. These must be
lubricated after every 50 hours of operation.