


ENGLISH
GB
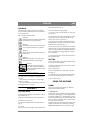
SYMBOLS
The following symbols appear on the machine.
They are there to remind you of the care and atten-
tion required in use.
This is what the symbols mean:
Warning!
Read the instruction manual and the safety
manual before using the machine.
Warning!
Do not insert your hands or feet under the
cover when the machine is in operation.
Warning!
Watch out for discarded objects. Keep on-
lookers away.
Warning!
Before starting repair work, remove the
spark plug cable from the spark plug.
Warning!
To minimise the risk of tipping
over, frame weights should be in-
stalled on the machine when using
the cutting deck.
INTRODUCTION
The cutting deck is available as standard in two
versions:
- with mechanical setting of the cutting height
(item no. 13-2936).
- with factory-fitted, electrical setting of the cut-
ting height (item no. 13-2937).
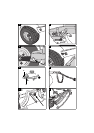
ASSEMBLY
CUTTING DECK
1. Install the deck mounts on the machine’s steer-
ing knuckles (fig. 1).
2. Place the cutting deck in front of the machine.
3. Remove the pins (fig. 2).
4. Screw the cutting deck into the deck mounts
(fig. 3).
5. 13-2937:
Connect the electrical contact to the socket on the
side of the machine (fig. 4).
6. Set the maximum cutting height.
7. Force the V-belt onto the machine’s centre pul-
ley A (fig. 5).
8. Lift the rear edge of the cutting deck and secure
with the pins (fig. 2). The basic setting for ma-
chines with 17“ tyres is position 3.
9. Tension the belt with the belt idler B. The belt
idler should be on the left side of the belt viewed
from the driver’s position (fig. 5).
10. Secure the lift spring’s snap hook in the imple-
ment lifter (fig. 6). The position of the snap hook
can be varied by threading it into different links in
order to achieve better lifting height or to follow
the ground better.
11. Secure the S-hook to one of the inner holes on
the implement lifter.
SETTING
In order for the deck to cut evenly and attractively,
it has to be correctly adjusted:
1. Make sure the air pressure in the tyres is correct:
Front: 0.6 bar (9 psi).
Rear: 0.4 bar (6 psi).
2. Place the machine on a level floor. Undo the
pins (fig. 2).
3. Adjust the deck so that the front and rear edge of
the cover are the same height above the floor.
4. Secure with the pins.
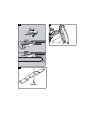
USING THE MACHINE
COMBI
Your new cutting deck combines two different
functions in the same product:
1. “MULTICLIP”
The machine comes equipped with a plug installed
in the ejector opening (fig. 7). The cutting deck can
be used for “Multiclip” i.e. the blade finely cuts up
the grass during mowing. The grass then falls into
the lawn where it is allowed to rot. This provides
the lawn with nourishment.
To remove the plug, the cutting deck must first be
folded up into the service position (see heading
SERVICE POSITION). Then unscrew the plug.