


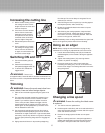

m CAUTION. After changing the line spool, run the
trimmer under no load for at least a minute to verify the
line and the tool are both operating correctly. Use only the
line spool as recommended by the manufacturer. To order
replacement line spool, visit www.snowjoe.com model #
TRJ601R3
Maintenance and cleaning
1. Store the tool, instruction manual and accessories in a
secure, dry place. Doing so will ensure you always have
the information available.
2. Keep the tool’s air vents unclogged and clean at all
times.
3. Remove dust and dirt regularly. Cleaning is best done
with a rag.
4. All bearings and bushes are lubricated for life.
5. Never use harsh agents to clean plastic parts.
m CAUTION. Do not use cleaning agents to clean the
plastic parts of the tool. A mild detergent on a damp cloth is
recommended. Water must never come into contact with
the tool.
General inspection
Regularly check that all the xing screws are tight. They may
vibrate loose after extended use.
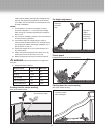
Storage
1. Keep the trimmer out of direct sunlight.
2. Do not store in a nylon bag as this can encourage the
formation of mold.
3. At the end of the season, give the trimmer a complete
cleaning and a thorough check.
4. Do not leave the trimmer resting on the oor for
extended periods as it could cause the shape of the
guard to alter, posing a safety risk. Hang it off the oor
by the top handgrip.
Electrical Safety for Charger
• Power tool plugs must match the outlet. Never modify
the plug in any way. Do not use any adapter plugs with
earthed (grounded) power tools. Unmodied plugs and
matching outlets will reduce risk of electric shock.
• Avoid body contact with earthed or grounded surfaces
such as pipes, radiators, ranges and refrigerators. There
is an increased risk of electric shock if your body is earthed
or grounded.
• Do not expose power tools to rain or wet conditions.
Water entering a power tool will increase the risk of electric
shock.
• Do not charge appliance in rain, or in wet locations
• Do not use battery operated appliance in rain
• Remove or disconnect battery before servicing, cleaning or
removing material from the gardening appliance.
• Use only the battery recommended by manufacturer.
• Do not dispose of the battery(ies) in a re. The cell
may explode. Check with local codes for possible special
disposal instructions.
• Do not open or mutilate the battery(ies). Released
electrolyte is corrosive and may cause damage to the eyes
or skin. It may be toxic if swallowed.
• Exercise care in handling batteries in order not to
short the battery with conducting materials such as
rings, bracelets, and keys. The battery or conductor may
overheat and cause burns.
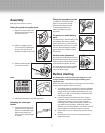
Charging the battery
The battery pack for this tool has been shipped in a low
charge condition. You should charge the battery pack
fully before use.
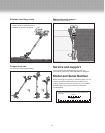
Step 1: Press the battery pack release latch
Step 2: Pull the battery pack, make it separate form the main
part of the appliance.
Step 3: Install battery in charger (See Installing battery in
charger below).
Step 4: Replace fully charged battery pack and assemble to
the main part of the appliance.
m WARNING. Do not use an extension cord.
m WARNING. Charge indoors only.
m WARNING. Do not throw used batteries into a re
or water: it could cause an explosion! Please hand in non-
working or used batteries, or tools with built-in batteries, to
the environmentally safe disposal unit at a municipal waste-
disposal center, or to your dealer.
Installing battery in charger
Turn the battery upside down and slide it into the matching
slots in the charger stand. Do not insert the battery the wrong
way.
NOTES:
a) Make sure the battery slides fully into the slots in the
charger.
b) The red indicator light will come ON when the electrical
outlet is “live”.
c) The red light will come on and green light ash ,when
the battery is properly inserted into the charger stand.
d) When the green and red light will come on steady, this
7