


25
51-3845, 7/04
Maintenance
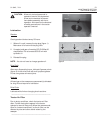
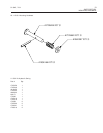
Adjusting Drive Chain Idler
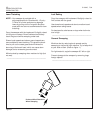
1. Clean debris off the idler adjustment screw
(figure 1) located on the drive end of the brush
head.
2. Disconnect the quick release end of the sweeper
drive shaft.
3. Raise the sweeper several inches off the ground.
4. Loosen the jam nut.
5. While rotating the brush manually, turn the idler
screw by hand until it will not tighten any more.
IMPORTANT – Avoid damage to the sweeper drive
mechanism. Tighten the idler by hand
only. Using a wrench or other tool can
result in overtightening the idler which
can damage the drive chain and other
parts.
6. Tighten the lock nut.
__________________________________________
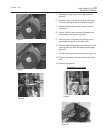
Adjusting Brush Contact Area
NOTE – Keep tires at the correct pressure.
1. Drive to a dirty section on a hard surface.
2. Set the brush on the ground and run it 30 seconds
without moving the tractor.
3. Stop, raise the brush head assembly, back away
and park the tractor.
4. Measure the path cleared. If the sweeper is ad-
justed correctly, the path will be 2-3 in. (51-76 mm)
wide.
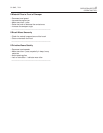
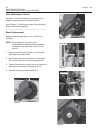
5. Adjust brush contact area with the brush adjust-
ment knob (figure 2). To make the path wider, lower
the brush head assembly by turning the knob to
the left (counterclockwise). To create a narrower
path, raise the brush head assembly by turning the
knob to the right (clockwise).
__________________________________________
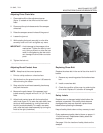
Replacing Shear Bolt
Replace the shear bolt in the end of the drive shaft if it
breaks.
1. Remove any remaining parts of the broken shear
bolt.
2. Install a new shear bolt.
3. Check the condition of the snap ring retaining the
drive shaft. Replace if it is broken or damaged.
__________________________________________
Safety Labels
Replace worn or damaged safety labels before the
sweeper is operated. If any safety labels become
damaged when parts are repaired, replace those
labels before operating the sweeper.
Keep all safety labels clean so they are easy to read.
Order replacement safety labels (shown on pages 11-
12 of this manual). Replacement safety labels are
supplied at no charge.
See page 10 for the location of safety labels on the
sweeper.
__________________________________________
Figure 1
Figure 2
MAINTENANCE SECTION
ADJUSTING DRIVE CHAIN IDLER/BRUSH PATTERN