


43
Troubleshooting, Adjustment, & Service
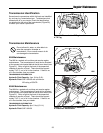
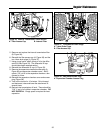
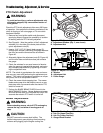
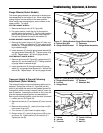
Figure 53. Mower Belt Routing
A. Idler Pulley Arm C. Belt Guide
B. PTO Clutch Pulley D. Arbor Drive Pulley
Mower Belt Replacement
44” & 50” PTO Belt Replacement
1. Park the tractor on a smooth, level surface such as a
concrete floor. Disengage the PTO, turn off the
engine and lock the parking brake. Remove the key.
Remove the mower or place in the lowest cutting
position.
2. Move the idler arm (A, Figure 53) to relieve belt ten-
sion. Drop the belt from the PTO (electric clutch) pul-
ley.
IMPORTANT: Note the position of all belt guides relative
to the belt and pulleys before loosening.
3. Loosen the nut and lockwasher securing the idler pul-
ley belt guide (C, Figure 53).
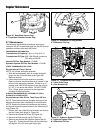
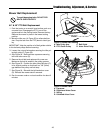
4. See Figure 54. Remove three capscrews securing
left-hand arbor cover (D).
5. Remove the old belt and replace with a new one.
Make sure the belt is seated in the pulley grooves.
6. See Figure 53. Position the idler pulley belt stop (C)
in its original position so that there is a 1/8" (3mm)
gap between the pulley and belt stop.
7. See Figure 54. Reinstall the left-hand arbor cover
(D). Reinstall the mower deck if removed.
8. Run the mower under a no-load condition for about 5
minutes.
D
B
C
A
Figure 54. Mower Deck
A. Capscrew
B. Right-hand Arbor Cover
C. Spring
D. Left-hand Arbor Cover
To avoid damaging belts, DO NOT PRY
BELTS OVER PULLEYS.
1/8” Gap
FRONT
A
D
B
C