


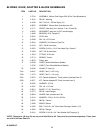
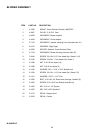
7
SECTION 1 – INSTALLATION
INTRODUCTION
This section covers installation of the Snapper
Commercial Grass Catcher Blower Kit for Snapper Mid
Mount Z-Rider mowers. FAMILIARIZE YOURSELF
WITH THIS PRODUCT BEFORE YOU BEGIN
INSTALLATION. See Sections for the PARTS
ILLUSTRATIONS and PARTS LISTS. Study these
pages. Become familiar with the parts, their method of
assembly, and also, their location.
Open the Hardware Bag and separate the nuts, bolts,
washers, etc. according to their size. Put the separated
fasteners into different bags/containers. This will speed
assembly time.
Read the following installation instructions carefully.
When you begin installation, make certain that you
follow the steps in sequence - as presented - this also
will save you time.
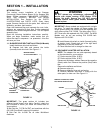
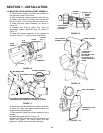
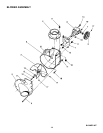
1.1 BLOWER DRIVE BELT INSTALLATION (All Models)
Install the blower drive belt as follows:
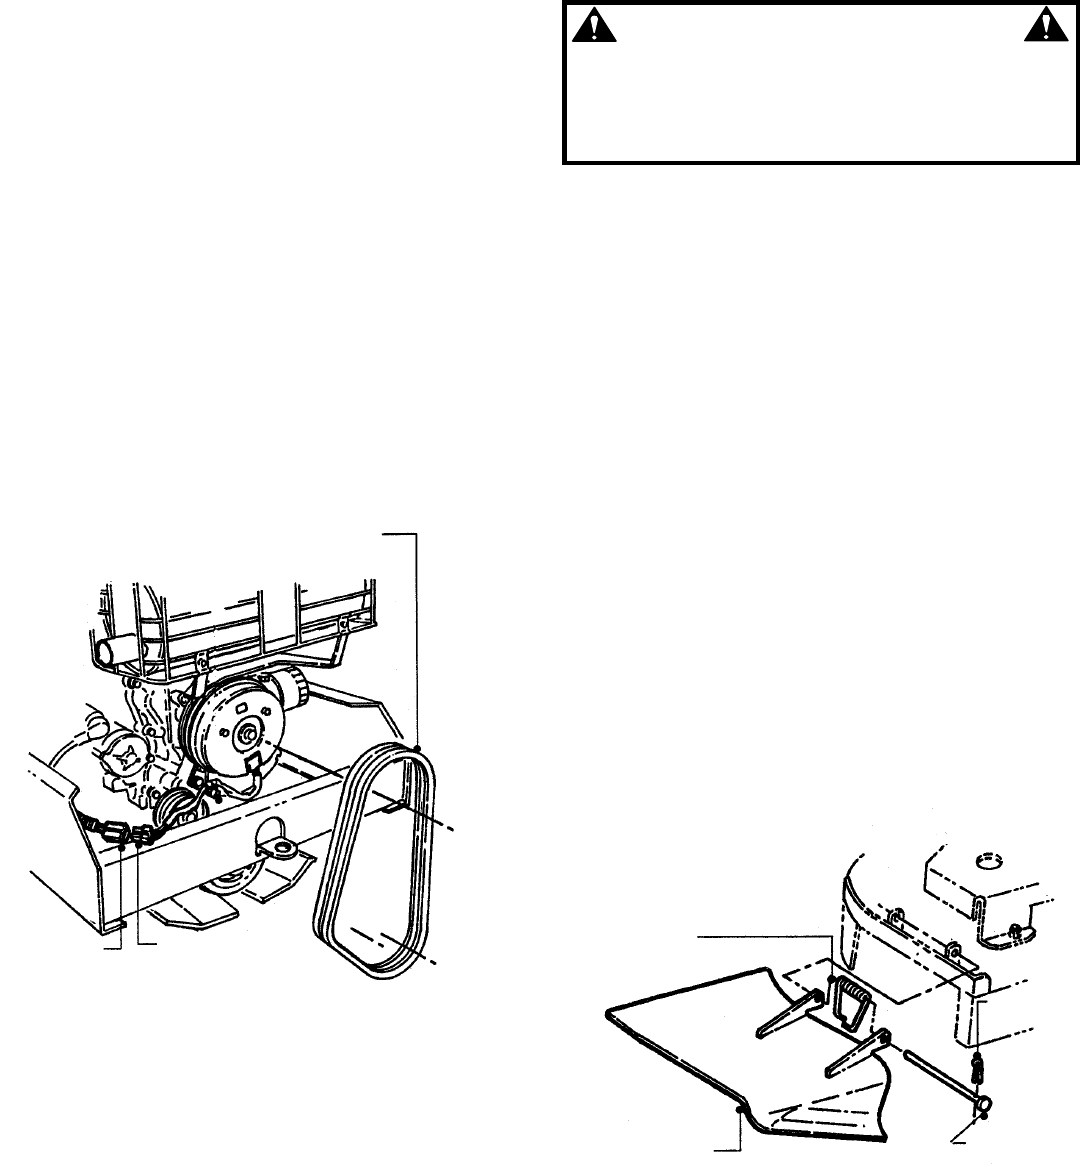
A. Depress belt idler and remove the inside
(forward) clutch drive belt. See Figure 1.1.
FIGURE 1.1
IMPORTANT: The grass catcher kit includes two
different length blower drive belts. Carefully check the
part numbers to insure you install the correct belt on
your machine.
1) Belt Part No. 7-2738 fits ZMT and machines with the
# 6-3165 Drive Shaft Lowering Kit installed.
2) Belt Part No. 4-6249 fits all other Mid-Mount
machines.
WARNING
DO NOT attempt any maintenance, adjustments or
service with engine running. STOP blades. STOP
engine. Set brake. Remove key. DO NOT operate
machine without entire grass catcher, deflector or
guards in place.
IMPORTANT: Some models are equipped with a single
belt drive. To install the catcher on these models, the
single groove pulley P/N 4-6969 must be replaced with
dual groove pulley P/N 7-2388. The idler pulley P/N 1-
8573 must also be replaced with P/N 3-5867. On MZM
Models only, do not use existing P/N 5-8209 belt.
Replace with P/N 3-5543.
B. Install blower drive belt on inside (forward) pulley
of electric clutch. Stretch belt out to the right hand
side and lay it over the frame rail.
C. Place the other belt in storage for later use.
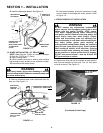
1.2 DISCHARGE ADAPTER INSTALLATION
NOTE: The adapter kits are sold separately based
on the size deck on your machine.
61” Decks require Kit No. 6-3076.
52” Decks require Kit No. 6-3077.
Disconnect the battery cables. Remove the negative
(Black) cable first. Remove the positive (Red) cable
last.
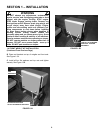
Remove the deflector as follows:
A. Remove cotter pin.
B. Remove deflector hinge pin and spring.
C. Remove deflector and store it, along with the
other parts, for later use. See Figure 1.2.
FIGURE 1.2
REMOVE INSIDE
CLUTCH DRIVE BELT
ELECTRIC CLUTCH
CONNECTOR
WIRING
HARNESS
CONNECTOR
REMOVE COTTER PIN, HINGE
PIN, SPRING & DEFLECTOR
SPRING
DEFLECTOR
HINGE PIN
COTTE
R
PIN