


Adjustments
23
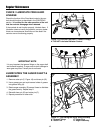
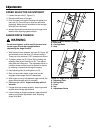
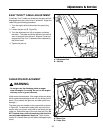
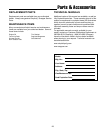
TRACTION DRIVE TENSION
Initial Adjustment
1. Lift the bellcrank arm (C, Figure 19) up as far as it will
go.
2. While holding the bell crank arm (C) up, adjust the
cable until all the slack is removed.
3. Back the adjustment screw (E) out 7-8 turns. Tighten
nut (D).
4. Start engine and check that the system disengages
when the control is released.
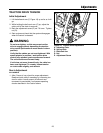
Run-In Adjustment
ALL MODELS
1. After 5 hours of use, check for proper adjustment.
Readjust clutch cable if necessary by increasing ten-
sion on cable. A small amount of bellcrank arm
movement is permissible if unit passes operating
checks described in the Caution above.
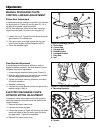
Figure 19. Traction Drive Adjustment
A. Adjusting Flats
B. Spring Hook
C. Bellcrank Arm
D. Nut
E. Adjustment Screw
WARNING
Do not over-tighten, as this may cause traction
drive to engage without depressing the traction
drive control (bellcrank arm must remain in down
position).
Verify that the cables are not over-tightened: With
speed selector in position 1 and traction drive
control fully released, push snowthrower forward.
The unit should move forward freely.
If unit does not move forward freely, the cable has
been over-tightened. To remedy, loosen tension
on clutch cable slightly, and recheck.
A
D
E
B
C