


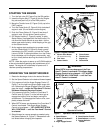
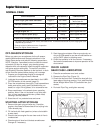
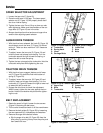
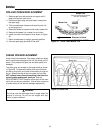

Figure 24. Belt Pattern (as viewed from front of
snowthrower)
A. Engine Pulley C. Idler Pulley
B. Drive Belt D. Driven Pulley
Belt Stops
Belt Stops (Auger Pulley Only)
03
Maintenance &
17
Service
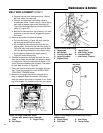
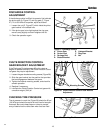
b. Remove the belt from the engine pulley. Slip the
belt from under the brake pad.
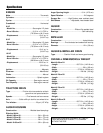
c. Remove six capscrews from bottom cover to
snowthrower frame. Loosen nuts (A, Figure 23) on
each side to release auger pulley belt stops (B,
Figure 22). Move belt stops and remove belt from
pulley (C, Figure 23).
d. Belt can be removed from top or bottom. For more
clearance to remove the belt, engage the traction
drive lever.
5. Remove the traction drive belt as follows:
a. Pull the idler pulley (I, Figure 22) away from the
belt and slip the belt from the pulley.
b. Slip the belt off the traction pulley and then the
engine pulley. The arm for the front idler pulley (G,
Figure 22) may have to be pivoted to provide clear-
ance for removing the belt from the traction pulley.
c. Pull the belt out between the auger pulley (F,
Figure 22) and traction pulley.
6. Reverse the procedure to install the belts. Be sure
there are no twists and the belts are properly seated
in the grooves. Adjust the belt stops so there is 1/8”
(3mm) clearance between belt and stop. The pattern
for both belts is shown in Figure 24.
7. Check the traction drive tension and auger drive ten-
sion. Follow the procedures under AUGER/TRAC-
TION DRIVE TENSION below.
8. Make sure the auger stops when the auger drive
lever is released. Make sure traction drive stops
when the traction drive lever is released. If not, check
the drive tension. If a problem exists, see your dealer.
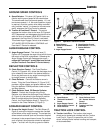
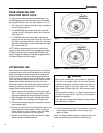
Figure 23. Belts and Pulleys
A. Capscrews F. Auger Pulley
B. Belt Guides G. Idler Pulley, Auger
C. Traction Drive Belt H. Traction Pulley
D. Auger Drive Belt I. Idler Pulley, Traction
E. Engine Pulley
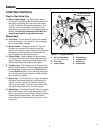
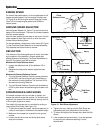
Figure 22. Auger Pulley Belt Stops
(shown with bottom cover removed)
A. Nuts C. Auger Pulley
B. Belt Stops
BELT REPLACEMENT (CONT.)