


Shop Fox
®
Classic Fence -7-
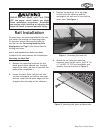
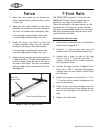
Mounting The Front Rail
1. Align the side of the front rail with two
rectangular cutouts against the edge of the
table.
2. Set the top edge of the front rail so it is
flush with the table top and the cutouts
are in line with the miter slots. If your saw
table has a beveled front edge, then align
the top of the rail with the bottom edge of
the bevel. See Figure 3.
Figure 3. Attaching the front rail bracket.
Bottom Edge
of Bevel
3. Attach the rail using the mounting
hardware from the old rail or two 3⁄8"-16
x 1"
or M10-1.5 X 25 hex head bolts and
washers. Secure as shown in Figure 2
.
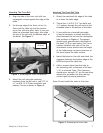
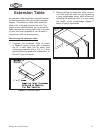
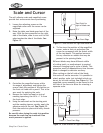
Figure 4. Shimming the front tube.
Mounting The Front Rail Tube
1. Orient the machined flat edge of the tube
so it faces the table edge.
2. Thread four 1⁄4-20 X 3⁄4" hex bolts and
1⁄4" washers through the rail and into the
threaded holes in the bottom of the tube.
3. If your table has a beveled front edge,
it may be necessary to install spacers or
shims between the rail and the rectangular
tube as shown in Figure 4. The spacers
should equal approximately the height of
the bevel (3⁄8" on most saws). Four to six
washers installed with each of the four
attachment screws should raise the height
of the tube enough to assure clearance of
the fence above the table surface.
4. Mount the fence on the rails and check the
clearance between the bottom edge of the
HDPE facing and the table top.
5. Add or remove shims from the tube to
rail mounting until a clearance of at least
1⁄16" is achieved. Note—This clearance
should never exceed 1⁄8", as this can allow
material to get under the fence during
certain types of sawing operations.
Note: Do not install the scale at this time.