


6
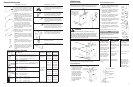
725267 All brass spray wand assembly
(21.6") for extra duty applications. Trigger
valve and spray tube are brass. 40 mesh
stainless steel nozzle and trigger valve filters
included. Fitted with JD-12P cone nozzle.
761882 Spray hood is used for nonselec-
tive herbicides when spraying under windy
conditions. Comes with Kematal 110-DEF-06
deflector fan nozzle and parts to assemble
spray hood to your existing Shindaiwa spray
wand.
902296 Brass spray boom (27.5") for use
with agrochemicals and foliar fertilizers
applied to row crops. Provides 40" coverage.
JD-12P cone nozzles and 40 mesh stainless
steel filter included.
907873 Flexible annealed copper boom
fitted with three JD-12P cone nozzles. For
use with agrochemicals and foliar fertilizers
on row crops. Can be easily shaped as
appropriate to provide proper coverage.
40 mesh stainless steel filter included.
831107 Brass extension (11.8") complete
with plastic fittings for extra reach. Attach-
able to original wand .
728139 Brass extension (23.6") complete
with plastic fittings for extra reach. Attach-
able to original wand .
100016 Brass extension (6.3") complete
with two JD-12P cone nozzles for doubling
output of agrochemicals and foliar fertilizers
on perennials. 40 mesh stainless steel filter
included.
646901 Flow calibrator bottle. For
accurate calibration of backpack sprayers to
prevent waste and damage to the environ-
ment.
336115 Brass Y nozzle for use on plants
requiring heavy applications of fungicides.
Complete with two JD-12P cone nozzles, 40
mesh stainless steel filter and plastic
fittings.
568774 Spray wand assembly (21.6")
Plastic handle, trigger valve and spray tube.
40 mesh stainless steel nozzle and trigger
valve filters included. Fitted with adjustable
cone nozzle.
285221 Standard Repair Kit and Nozzle
for SP518. Includes (2) Piston cups, trigger
valve needle, nozzle filter, JD-12P cone
nozzle, nozzle cap, and deflector nozzle.
Part Number Description
Part Number Description
Optional Accessories
565648 Plastic anti-drip valve for
agrochemicals and foliar fertilizer applica-
tion. Attaches to wand and is compatible
with any type of cone or flat fan nozzle.
Flat Fan
Cone
Cone
Flat fan
Deflector
Part Number
437756 110-SF-015 Kematal green, 0.16 gpm @ 45 psi
437764 110-SF-02 Kematal yellow, 0.21 gpm @ 45 psi
437772 110-SF-03 Kematal blue, 0.33 gpm @ 45 psi
717942 JD-10A Stainless steel
217174* JD-12P Stainless steel
437855 110-LD-03 Kemetal blue, 0.33 gpm @ 45 psi
457317 HC-02 Kematal yellow
457325 HC-04 Kematal red
457333 HC-05 Kematal brown
457390 DEF-04 Kematal red
457408 DEF-05 Kematal brown
457416* DEF-06 Kematal gray
Application
Herbicides
Agrochemicals
and foliar
fertilizers
Pressure
psi (kg/cm
2
)
45 (3.2)
45 (3.2)
45 (3.2)
45 (3.2)
45 (3.2)
45 (3.2)
45 (3.2)
45 (3.2)
15 (1.0)
15 (1.0)
15 (1.0)
45 (3.2)
45 (3.2)
45 (3.2)
Flow Rate
gal (ml)/min
0.16 (610)
0.21 (810)
0.33 (1250)
0.08 (300)
0.16 (615)
0.16 (615)
0.22 (830)
0.44 (1680)
0.54 (2060)
0.25 (950)
0.32 (1200)
0.41 (1540)
0.08 (315)
0.17 (640)
Nozzle Type
AVAILABLE SPRAY NOZZLES
Flat Fan
Low Drift
Adjustable
Cone
Note: All Shindaiwa sprayers come with the red adjustable
cone nozzle P/N 015024 installed as standard equipment.
838052 Constant pressure valve reduces
pumping action, reduces drift and delivers
uniform spraying. Improves productivity and
saves chemicals.
323725 Yellow 0.08 gpm @ 45 psi.
015024 Red 0.17 gpm @ 45 psi.
325787 Blue 0.18 gpm @ 45 psi.
* Denotes nozzles included in the SP518
standard repair kit.
452284 All Purpose Wrench for periodic
maintenance and repair.
229724* Nozzle cap for attaching flat fan
and cone type nozzles.
7
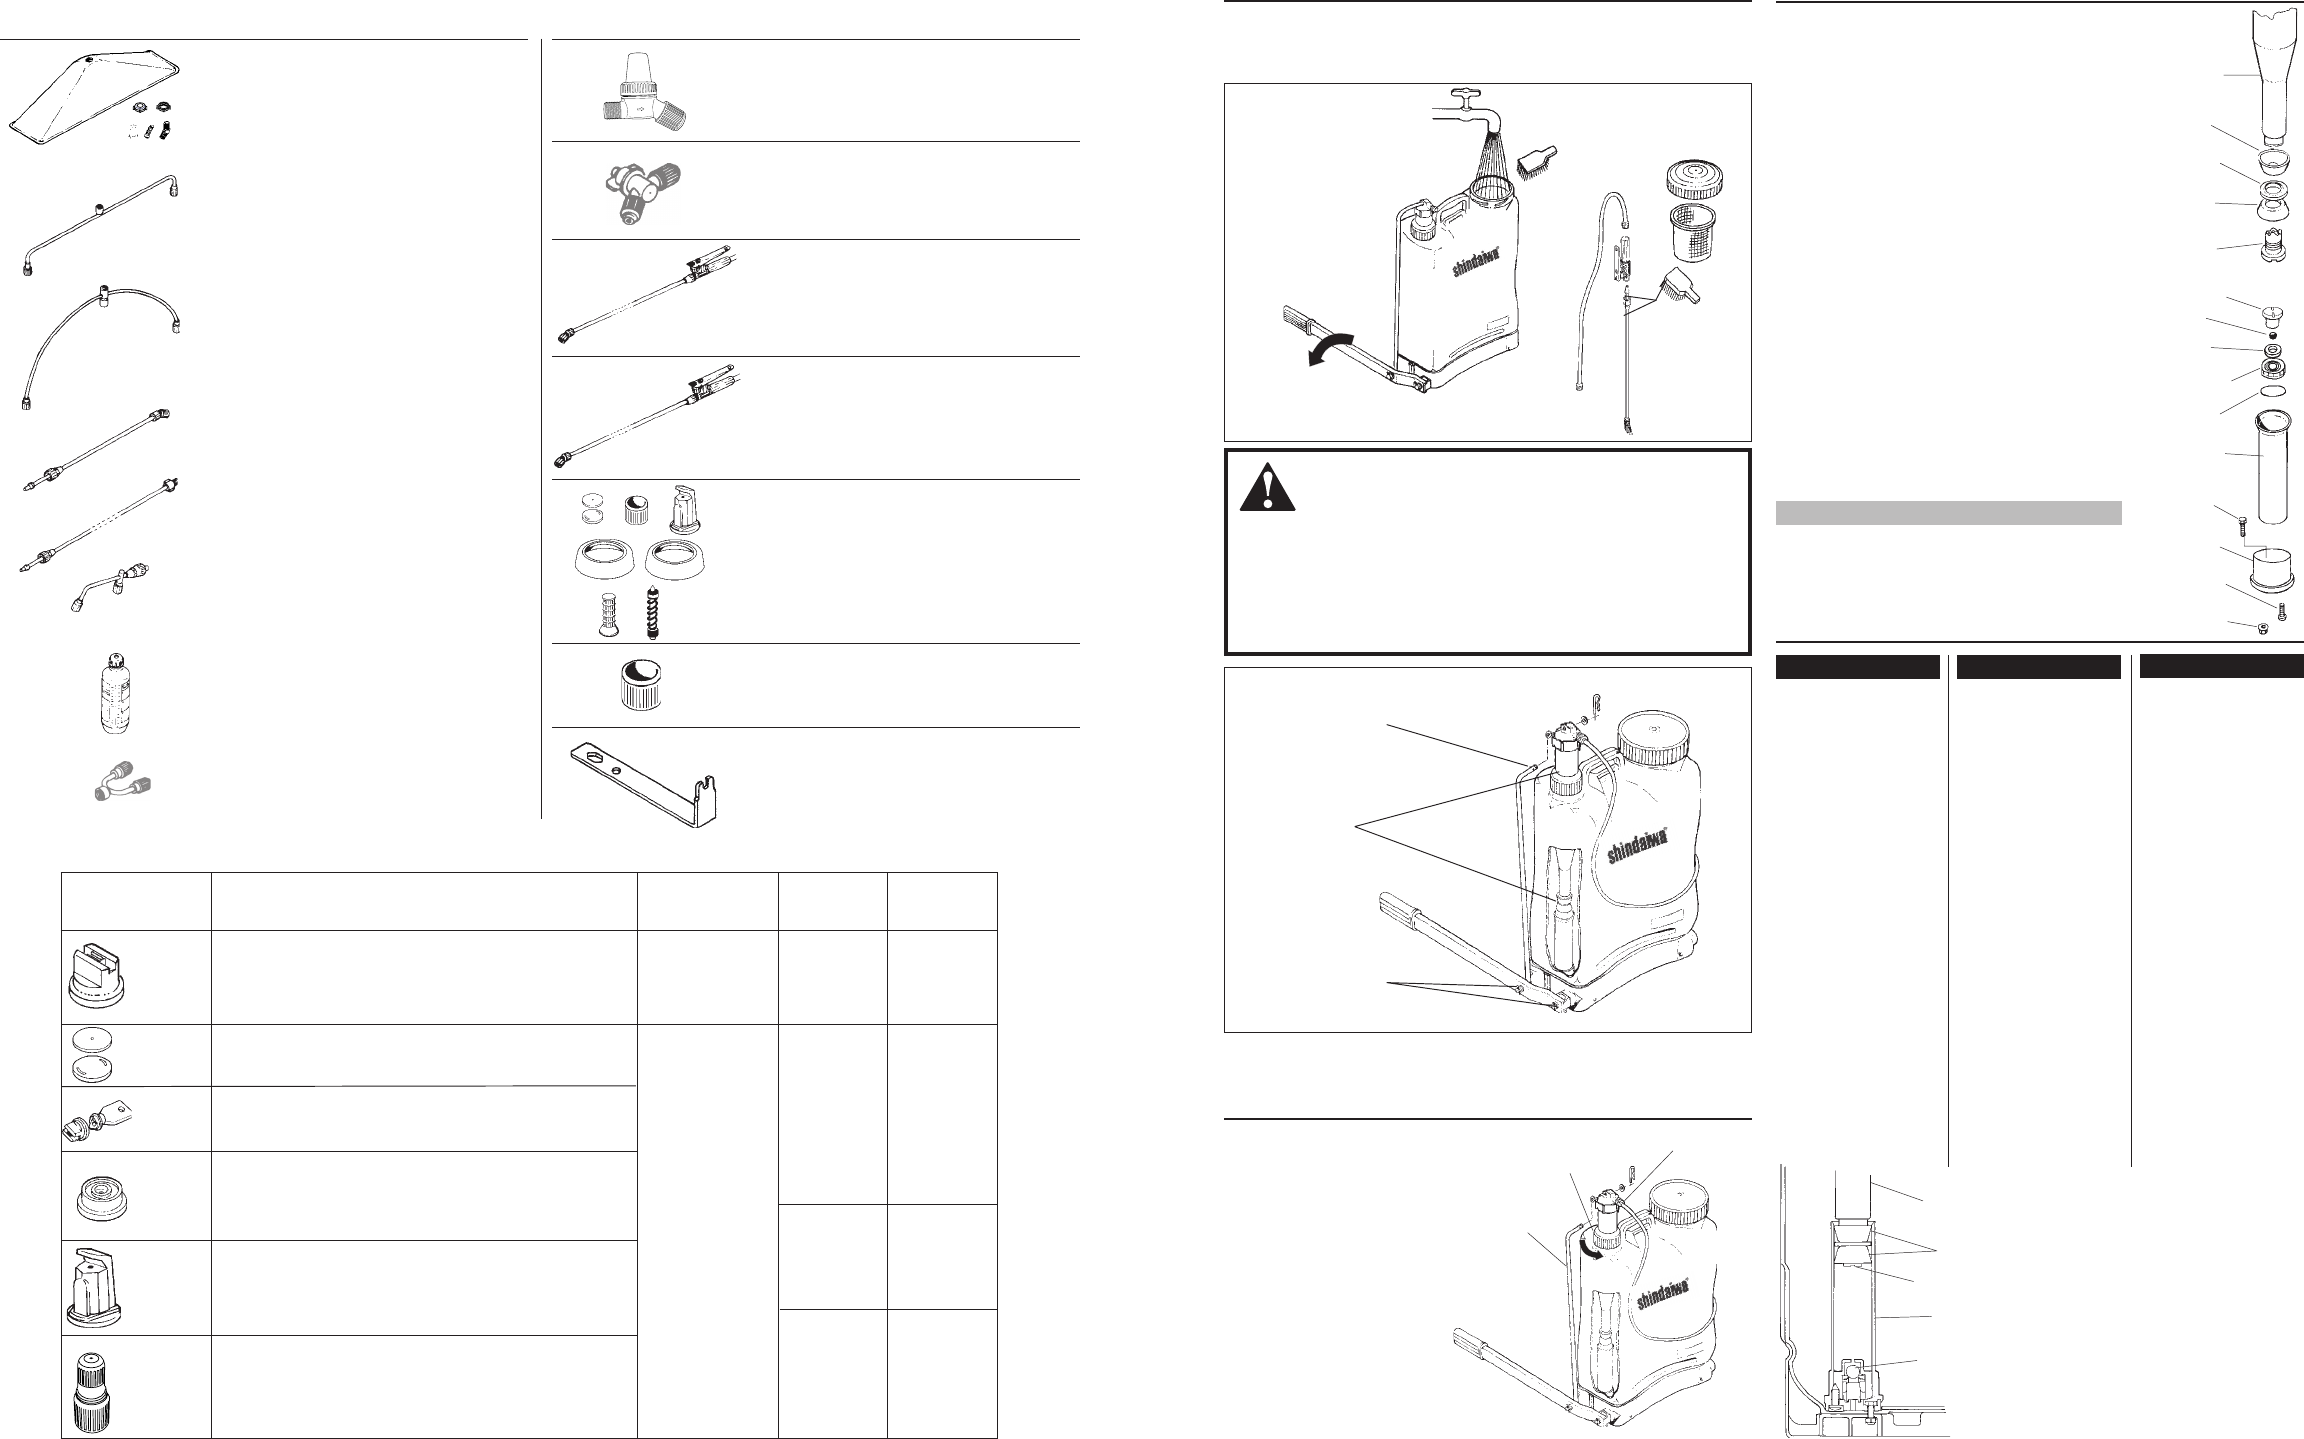
Pump the lever with
the trigger valve
disconnected until
the discharge runs
clear
WARNING!
Remove all chemicals and wash before storing the
sprayer. Chemical products have different reactions and
can cause damage to the sprayer components and the
environment. Unidentified chemicals left in the sprayer
tank can pose a serious health threat to anyone servicing
the unit and unaware of its presence!
Periodically clean and lubricate the pump chamber and
actuating linkage with a high quality lithium grease.
Lubricate
Lubricate
(disassembly
required)
Lubricate
Pump Disassembly
Pump Lever
Connecting Rod
Packing
Ring Nut
Cleaning the Sprayer
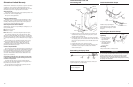
After finishing the spray application, empty the sprayer and
wash all equipment in an approved decontamination area.
1. Remove the pump lever
connecting rod from the
chamber. Loosen the
packing ring nut that
secures the chamber
to the tank. Remove the
tank lid and strainer,
reach inside the tank
and slide the agitator
down the pump cham-
ber, then remove the
chamber from the
cylinder.
Screw Cap
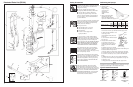
Maintenance
2. Using the 452284 all-purpose wrench,
remove the chamber valve and cups.
Replace as necessary.
3. Remove the two flanged nuts from the
outside of the tank below the pump
cylinder with a 10 mm socket and
remove the cylinder.
4. Remove the two Phillips head screws
located at the bottom of the cylinder
and remove the cylinder base.
5. From the bottom of the cylinder, push
the ball seat assembly towards the top
and out of the cylinder.
6. Unscrew the ball lock from the valve
seat and remove the ball and seat.
7. Clean all parts and carefully inspect
for worn or damaged parts and replace
as necessary.
8. Reassemble in the reverse order.
NOTE:
Lubricating all moving parts with a high
quality lithium grease will ease assembly
and prolong the life of the unit.
Pump
Chamber
Piston
Cup
Chamber
Valve
Cylinder
Ball
Valve Seat
Bolt
Cylinder
Base
Flanged
Nut
Screw
Piston
Cup
Spacer
Ball Lock
Seat
Troubleshooting: Lack of Pressure
Pump Disassembly (cont.)
O-Ring
CAUSE
REMEDY
Leakage through
the upper cylinder.
After pumping and
pressurizing the
chamber, the pump
lever drops rapidly
when released.
After pumping and
pressurizing the
chamber, the pump
lever rises slowly
when released.
Low pressure and
pump lever hard to
operate.
Worn or dried out
piston cups.
Cylinder ball or seat
not sealing properly
due to wear or
impurities.
Chamber valve not
sealing properly
due to wear or
impurities.
Pump chamber
filled with liquid.
Lubricate or replace
the piston cups.
Clean or replace the
cylinder ball or seat.
Clean or replace the
chamber valve.
Tighten screw cap
at top of chamber.
With an empty tank,
pump lever with
trigger valve open
until all liquid is
purged from pump.
Pump Chamber
Piston Cup
Chamber Valve
Cylinder Ball
Cylinder
SYMPTOM