


16
OPERATION
35712
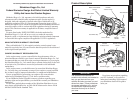
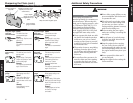
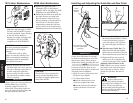
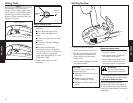
Preparing to Start the Saw
Throttle Lockout
Lever
Throttle Lock
Button
Throttle
Trigger
Ignition
Switch
WARNING!
The saw chain will rotate
when the saw is started!
Clear a safe work area before
starting the saw!
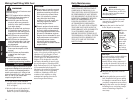
IMPORTANT!
Engine ignition is controlled by a two-
position “ON-OFF” switch located
below the throttle lever. This switch is
labeled “I” for ON and “O” for OFF.
Control Positions (cold engine)
1. Switch the ignition ON
(“I” position).
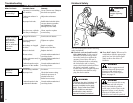
2. Choke the engine by pulling the
choke control all the way out (choke
is closed).
3. Set the throttle to “fast idle” by
performing the following:
■ Depress the throttle lockout lever.
■ Squeeze the throttle trigger.
■ Press and hold the throttle lock
button while releasing the throttle
trigger.
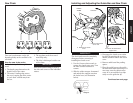
35713
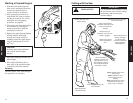
Pull the choke
control out to
close.
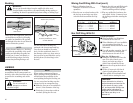
Control Positions (warm engine)
■ Set the throttle to “fast idle” (as
discribed in step 3).
IMPORTANT!
The throttle lever cannot be moved
without first depressing the lockout
lever.
25
OPERATION
NOTE:
If the felling cut appears to be closing
on the bar, use a mallet to drive one or
two plastic or wooden wedges into the
cut behind the bar.
5. Stop the saw, and put it down.
6. Use your retreat path to exit the
area quickly.
Felling Small Trees
(less than 6 inches in diameter)
1. Determine the direction of fall. If
you are uncertain as to direction of
fall, use the procedure “Falling
Large Trees”.
2. Start cutting on the side of the tree
away from the direction of fall, and
make a single felling cut all the way
through the tree.
3. Stop the saw and put it down on the
ground.
4. Use your retreat path to exit the
area quickly.
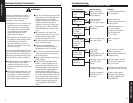
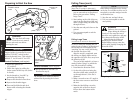
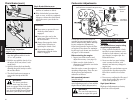
Felling Large Trees
(more than 6 inches in diameter)
If a tree is otherwise healthy and not
seriously out of balance, its direction of
fall can often be encouraged by first
“notching” the tree on the side facing
the desired direction of fall.
After the notch is completed, start
the felling cut slightly higher and on
the opposite side of the tree, away from
the direction of fall.
The goal of this method is to leave a
sturdy wooden “hinge” on which the
tree will pivot while it’s falling.
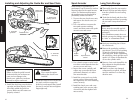
1. Determine the direction of fall.
2. On the side of the tree facing the
direction of fall, make a single 90°
cut through about 1/3 the tree’s
diameter.
3. Make a second cut at a 45° angle to
the first cut to remove a notch from
the tree.
4. Make the final felling cut on the
opposite side of the tree about 2
inches above the bottom of the
notch.
WARNING
Failure to leave a wooden
hinge during the felling or
“back cut” can cause the tree to
pinch the saw’s guide bar, and may
also change the direction of fall!
Always make the felling cut
parallel to the bottom cut! An
angled falling cut may cause the
tree to split, possibly changing the
direction of fall!
CHN-11
Direction of
Fall
Hinge
Felling
Cut
Notch
Felling Large Trees
Felling Trees (cont.)