


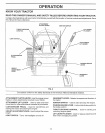
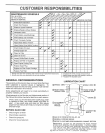

ASSEMBLY
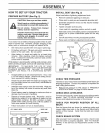
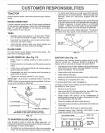
INSTALL BATTERY (See Figs. 4 and 5)
H'H'I'HHHH'U'
CAUTION: Do not short battery termi-
nals, Before installing battery, remove
metal bracelets, wristwatch bands,
rings, etc.
Positive terminal must be connected
first to prevent sparking from acciden-
tal grounding.
o Lift hood to raised position.
o Be sure battery drain tube has not come loose and is
securely attached to drain in battery tray
o Lower battery into battery tray with terminals to front of
tractor.
• First connect RED battery cable to positive (+) battery
terminal with hex bolt, flat washer, lock washer and hex
nut as shown. Tighten securely
• Connect BLACK grounding cable to negative (-) battery
terminal with remaining hex bolt, flat washer, lock
washer and hex nut, Tighten securely
. Slide the two battery bolts through the terminal guard
and start the wing nuts onto the threads,
• Position terminal guard over battery as shown, lower
battery bolts into key holes and slide square shafts of
battery bolts into slots of key holes.
. Tighten wing nuts by hand making sure battery bolts
remain in slots of the key holes in the battery support.
. Be sure terminal access doors are closed,
Use terminal access doors for:
• Inspection for secure connections (to tighten hard-
ware).
. Inspection for corrosion.
. Testing battery.,
. Jumping (if required).
• Periodic charging,
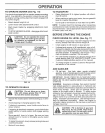
LOCK
WASHER
HEX NUT,,.,._
FLAT
WASHER
(POSITIVE)
(NEGATIVE)
BLACK CABLE
BOLT
DRAIN TUBE
FIG_4
WING NUTS _ TERMINAL
BATTERY _'_ _.._" / _'_TERMINAL
.... ___ACCESS
UUL, "-___ DOORS
. I It I! _ _ VENTCAPS
_" KEY HOLE
FIGo 5;
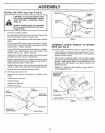
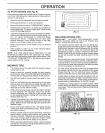
ASSEMBLE GAUGE WHEELS TO MOWER
DECK (See Fig. 6)
Assemble gauge wheels with tractor on a flat tevel surface,
. Adjust mower to desired cutting height (See 'q-O AD-
,JUST MOWER CUTTING HEIGHT" in the Operation
section of this manual).
• With mower in desired height of cut position, gauge
wheels should be assembled so they are slightly off the
ground. Install gauge wheel in appropriate hole with
shoulder bolt, 3/8 washer and 3/8-16 Iocknut and
tighten securely.
° Repeat for opposite side installing gauge wheel in
same adjustment hole.
GAUGE WHEEL
MOUNTING
BRACKET
3_-16
LOCKNUT
3/8 WASHER
GAUGE WHEEL
_SHOULDER
BOLT
FIG. 6