


EMo ,Y
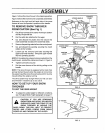
TO INSTALL THE UPPER HANDLE AND
CRANK ASSEMBLY
o
I
o
0
qll
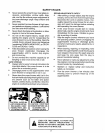
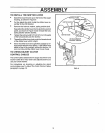
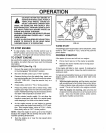
On the rightside of the handle, install and secure the
following parts (found in parts bag) in the lower
handle hole as shown in figure 4A:
1 - 3/8" x 2" bolt
2 - 3/8" flat washers & 1 - 3/8" split lockwasher
1 ° 3/8" nut
Remove the 3/8" nylon Iocknut and flatwasher from
tl_e "eye" bolt assembly (on the chute crank assem-
bly) and adjust the remaining 3/8" nut and flatwasher
on the "eye" bolt about half way up the thread..
Install "eye" bolt through lower hole on the left hand
side of the handle.
Install the 3/8" flatwasher and the 3/8" nylon locknut
loosely on the "eye" bolt, as shown°
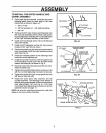
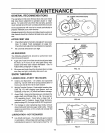
Remove the plastic cap, the cotter pin and the washer
from the wormed end of the crank assembly and set
aside (See Fig. 5).
• Rotate the notched section of the discharge chute
toward the crank-adjusting rod_
• Install the wormed end of the crank through the hole
in the adjusting rod and secure the end with the flat
washer and cotter pin, as shown in Fig. 5o
• Bendtheendsofthecotterpinaroundtherod andre-
install the plastic cap°
• Tighten the eye bolt installed earlier, keep eye in line
with the rod while tightening the inside nut securely,
• Tighten the outside 3/8" jam nut up against the other
3/8" jam nut (See Fig..4B).
• Rotate the chute crank fully c!ockwise and fully
counter-clockwise. The discharge chute should ro-
tate fully to the outer diameter of the worm and should
clear' approximately 1/8" (see Fig. 5), If the chute
crank needs to be adjusted, go to the Service and Ad-
justments section on page 17.
NOTE: Be sure the crank does not touch the side of the
engine or'the cover will be scratched.
PJGHT HANDLE
ADJUST NUTS TO MOVE
LEFT HANDLE EYE BOLT IN OR OUT
EYE BOLT
TIGHTEN _/8" JAM
NUT UP AGAINST
OTHER 3/_," JAM NUT
FIG. 4B
J ii iiii / .... , ,,,lllUiiii JiiJ i1,11,,i,ii iiiiii i iii / ,,
PLASTIC _ NOTCHED SECTION
,,b
CAP COTTER
INCH CLEARANC
FLATWASHER
1/2 INCH
CRANK ADJUSTING ROD
WORM
FIG. 5