


NOTE: If the unit is
operated without
the air filter, you
will VOID the
warranty.
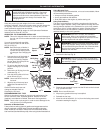
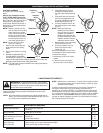
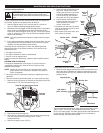
7. Reinstall the air filter
cover. Position the
slots on the top of the
air filter cover onto the
tabs at the top of the
back plate (Fig. 28).
8. Swing the cover down
until the tab on the air
filter backplate snaps into place in the slot on the air filter cover
(Fig. 29).
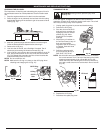
IDLE SPEED ADJUSTMENT
The idle speed of the engine is
adjustable. An idle adjustment
screw is between the air filter
cover and the engine starter
housing (Fig. 30).
NOTE: Careless adjustments
can seriously damage
your unit. Aside from
the idle speed, only a
Sears or other qualified
service dealer should
make carburetor
adjustments.
1. Check Fuel
Old fuel is usually the reason for idle speed problems. Drain and
refill the tank with fresh fuel prior to making any adjustments. Refer
to Oil and Fuel Information.
2. Clean Air Filter
The condition of the air filter is important to the operation of the
unit. A dirty air filter will restrict air flow. This is often mistaken for
an out of adjustment idle. Check the condition of the air filter before
adjusting the idle speed screw. Refer to Air Filter Maintenance.
MAINTENANCE AND REPAIR INSTRUCTIONS
AIR FILTER MAINTENANCE
Cleaning the Air Filter
Clean and re-oil the air filter every 10 hours of operation. It is an
important item to maintain. Failure to maintain your air filter properly
can result in poor performance or can cause permanent damage to
your engine.
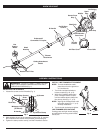
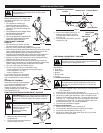
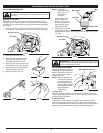
1. Open the air filter cover. Push the tab on the under side of the
cover inward. Then pull the air filter cover out and up. (Fig. 24).
2. Remove the air filter (Fig. 23).
3. Wash the filter in detergent and
water (Fig. 25). Rinse the filter
thoroughly and allow it to dry.
4. Apply enough clean SAE 30 motor
oil to lightly coat the filter (Fig. 26).
5. Squeeze the filter to spread and
remove excess oil (Fig. 27).
6. Replace the filter (Fig. 24).
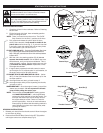
WARNING: To avoid serious personal injury, always
turn the unit off and allow it to cool before you clean or
service it.
Air Filter Cover
Air Filter
Tab
Fig. 24
Fig. 25
Fig. 26
Fig. 27
Idle Adjustment Screw
Fig. 30
Fig. 28
Locking Tab
Tabs
Back Plate
Air Filter
Air Filter Cover
Air Filter
Tab
Fig. 29
WARNING: To prevent serious personal injury, make
sure the cutting attachment has stopped rotating before
you turn it off and set it down.
11