


33
R
Section 7
CUTTER BLADES7.8
A. BLADE INSPECTION
Remove the ignition key before servicing the blades.1.
Raise the mower deck to the highest position. Place 2.
the lanyard pin in the highest cutting height position
to prevent the cutter deck from falling.
WARNING
Always wear proper hand and eye protection when
working with cutter blades.
Check the cutter blades for straightness. If the cutter
3.
blades appear bent, they will need to be replaced.
WARNING
Do not attempt to straighten a bent blade, and
never weld a broken or cracked blade. Always
replace it with a new blade to assure safety.
If a blade cutting edge is dull or nicked, it should be 4.
sharpened. Remove the blades for sharpening. See
"Blade Replacement."
- NOTE -
Keep the blades sharp. Cutting with dull blades not
only yields a poor mowing job, but slows the cutting
speed of the mower and causes extra wear on the
engine and the blade drive by pulling hard.
B. BLADE SHARPENING
- NOTE -
If possible, use a file to sharpen the blade. Using
a wheel grinder may burn the blade.
- NOTE -
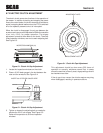
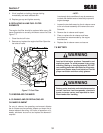
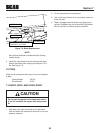
DO NOT sharpen the blades beyond 1/3 of the
width of the blade. See Figure 7-8.
Sharpen the cutting edge at the same bevel as the
1.
original. See Figure 7-8. Sharpen only the top of the
cutting edge to maintain sharpness.
SGB033
Angle Blade Back
Do Not Cut In
X Must NOT Exceed
1/3 Blade Width
X
30
Blade SharpeningFigure 7-8.
Check the balance of the blade. If the blades are out 2.
of balance, vibration and premature wear can occur.
See your authorized Scag dealer for blade balancing
or special tools, if you choose to balance your own
blades.
C. BLADE REPLACEMENT
WARNING
Always wear proper hand and eye protection when
working with cutter blades.
Remove the ignition key before replacing the blades.1.
Raise the mower deck to the highest position. Place 2.
the lanyard pin in the highest cutting height position
to prevent the cutter deck from falling.
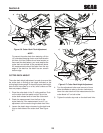
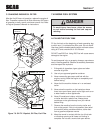
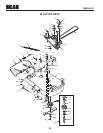
Secure the cutter blades to prevent them from 3.
rotating, (use the optional Blade Buddy tool P/N
9212, to assist in securing the cutter blades), remove
the blade attaching bolt. Remove the cutter blade,
bolt, lockwasher and flatwasher from the spindle
shaft. See Figure 7-9.
To install the new cutter blade, put the lockwaher and 4.
flatwasher onto the blade bolt and slide the bolt into
the hole in the cutter blade.