


8 — English
ASSEMBLY
WARNING:
If any parts are damaged or missing do not operate
this product until the parts are replaced. Failure to heed
this warning could result in serious personal injury.
WARNING:
Do not attempt to modify this product or create accesso-
ries not recommended for use with this product. Any such
alteration or modification is misuse and could result in a
hazardous condition leading to possible serious personal
injury.
WARNING:
To prevent accidental starting that could cause serious
personal injury, always disconnect the engine spark plug
wire from the spark plug when assembling parts.
WARNING:
Disconnect the spark plug wire before assembling parts.
Failure to do so could result in possible serious personal
injury.
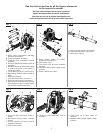
ASSEMBLING THE BLOWER TUBES
See Figures 3 - 5.
Place a tube clamp in the groove on elbow and install the
elbow tube onto blower. Tighten large clamp securely.
Place clamp in the groove on the bellows and install the
bellows onto the elbow. Tighten clamp securely.
Insert upper tube into adjustable handle. Position the
adjustable handle in the center of upper tube and tighten
thumb screw securely.
NOTE: The position of the adjustable handle may be
moved for the best comfort after the blower is strapped
onto the operator’s back.
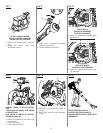
Place clamp in the groove on the bottom end of the bellows
and install the upper tube onto the bellows. Tighten clamp
securely.
Join the lower tube and nozzle together by aligning raised
locking tabs on lower tube with the raised locking slots
on nozzle and twist to secure.
Assemble the connected lower tube and nozzle to the
upper tubes by aligning raised locking tabs on the upper
tube with the raised locking slots on connected lower
tubes by twisting to secure.
NOTE: Check all locking connections to ensure they are
tightly secured.
CAUTION:
Make all adjustments to the harness straps before start-
ing the blower to avoid the possibility of injury.
ADJUSTING HARNESS AND WAIST STRAPS
Straps should be adjusted to a comfortable position before
starting the blower.
To adjust harness strap assembly:
Blower should be in operating position before adjusting
the harness straps. Slip arm through harness strap and
onto shoulder, then repeat for the other shoulder.
There are three possible height adjustment positions that
can be used to easily adjust harness.
Slip top buckle of harness from adjustment slot and
position to desired height location.
Tighten (pull down on strap) or loosen (lift up on tab of
strap buckle) each harness strap as needed, until each
is adjusted to a comfortable operating position.
Chest strap should be tightened or loosened until adjusted
to a comfortable operating position.
To adjust waist strap assembly:
Waist strap should be tightened or loosened until adjusted
to a comfortable operating position.
ADJUSTING ADJUSTABLE HANDLE
See Figure 6.
Loosen thumb screw by twisting counterclockwise.
Move adjustable handle to desired position and secure
screw by twisting clockwise.