


MAINTENANCE AND REPAIR INSTRUCTIONS
14
2. Pull out the bump knob, spring, and foam seal
(Fig. 19, Pg. 13).
3. Pull the inner reel with existing line from the outer
spool (Fig. 19, Pg. 13).
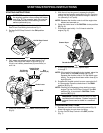
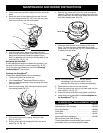
4. Remove any existing line from the inner reel before
cleaning. Remove any debris or grass from the knob,
spring, inner reel, and foam seal. Wash the inner reel
with warm soapy water (Fig. 22).
Inner Reel
Shaft
Plunger
NOTE: The inner reel must be totally dry before
reinstalling it into the outer spool. Do not
lubricate the inner reel or outer spool assembly.
6. Place the inner reel into the outer spool.
7. Place the bump knob, spring, and foam seal into the
inner reel (Fig. 19, Pg. 13).
8. Press the bump knob down and tighten clockwise.
9. Install new line as described in
Line Installation for
the SpeedSpool
®
Pg. 12.
5. Clean the shaft and the inner surface of the outer
spool. To clean the shaft underneath the plunger,
press down on the plunger (Fig. 23). Remove any dirt
or debris from the shaft.
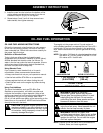
Fig. 21
Fig. 23
Fig. 22
Cleaning the SpeedSpool
®
Cleaning the SpeedSpool
®
may be necessary,
• To remove jammed or excess line,
• If the SpeedSpool
®
becomes difficult to wind or
does not operate correctly when bumping the head
on the ground,
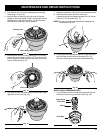
1. Hold the outer spool, and unscrew the bump knob
counterclockwise (Fig. 21).
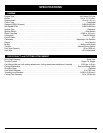
Replacement Line . . . . . . . . . . . . . . . . . . . . . . . . 181472
Replacement Line Cartridge . . . . . . . . . . . . . . . . 181460
Inner Reel Spring . . . . . . . . . . . . . . . . . . . . . . . . 181465
Foam Seal . . . . . . . . . . . . . . . . . . . . . . . . . . . . . . 181467
Inner Reel . . . . . . . . . . . . . . . . . . . . . . . . . . . . . . 181464
Bump Head Knob Assembly . . . . . . . . . . . . . . . . 181468
(Bump Head, Inner Reel, Spring, )
These SpeedSpool
®
replacement parts can be
purchased from your local authorized dealer.
SPEEDSPOOL
®
REPLACEMENT PARTS
4. Hold the inner reel in place and install the bump
knob, spring and foam seal. Press down and turn the
bump knob clockwise. Grasp the ends and pull
firmly to release the line from the holding slots in the
inner reel (Fig. 18, Pg. 13).
Releasing the Inner Reel
If the SpeedSpool
®
does not release line correctly, pull
the ends of the line firmly from the spool (Fig. 18, Pg.
13). If this does not release line, follow the Cleaning
the SpeedSpool
®
instructions.
2. Pull the old inner reel with existing line from the outer
spool.
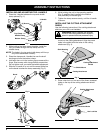
3. Insert the ends of the prewound inner reel line into
the outer spool eyelets (Fig. 20). Push the new inner
reel, arrow side up, into the outer spool.
Fig. 20