


Rover Mowers Limited Ride-on Mower Grass Catcher Rover Mowers Limited Ride-on Mower Grass Catcher
Page 3 Page 4
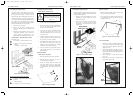
3.2 Installing the Support Bracket
The Grass Catcher mount support plate part No:
A12666 has four sets of mounting holes to suit all
front engine Rover ride-on mowers currently
manufactured by Rover. Refer figures 3.2a and 3.3b.
To fit the grass catcher to 17 and 18 series Rover ride-
on mowers the support mount plate supplied with the
grass catcher has to be replaced with the support
mount plate part No: A12942 which can be purchased
from any Authorised Rover Service Dealer.
1. Tilt the mower seat forward.
2. Remove the seat springs / buffers from the
mower by unbolting the centre retaining bolt
and nut.
3. Position the support bracket over the two seat
spring/buffer mounting holes. Retain the
support bracket by replacing the seat
springs/buffer and retaining nuts. (Figure 3.2a)
Mounting Holes - Support Bracket to Chassis
Refer figure 3.2b.
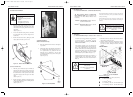
3.5 Installing the Support Bracket
The Grass Catcher is supported off the rear towbar of
the Rover Rancher
TM
, Raider
TM
and Lawn King
TM
ride-
on mowers. Refer figure 3.3.
1. Lift the grass catcher assembly onto the mower,
positioning the support saddles on the rear
towbar on the mower.
2. Secure the grass catcher to the support bracket
by two 3/8” x 1” unc bolts and 3/8” unc nyloc
nuts. Placing a 3/8” flat washer under the nut
and bolt head.
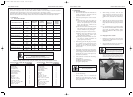
3.6 Frame Assembly
The internal frame assembly consists of the two side
frames (A) and spreader plate (B).
These components are fastened together using 3/16”
x 1” round head screws (C) and 3/16” unc. nyloc nuts
(D) (Refer Figure 3.5).
3.7 Frame Installation
1. With the grass catcher assembly mounted on the
mower, open up the grass catcher fully. To hold
the grass catcher open, tighten the pivot bolts.
(Refer Figure 3.6)
2. Insert the internal frame assembly (A) into the
grass catcher, aligning the mounting holes on
the internal frame over the locating bolts on the
catcher assembly.
3. Secure using four 1/4” nyloc nuts (B). (Refer
Figure 3.6)
4. Loosen the two pivot bolts so that the catcher
bag assembly swings easily.
Lawn King
TM
- fitted with 20” Rear Tyre
Rancher
TM
Auto, Selector & Hydro Drive
Raider
TM
Lawnking
TM
- 18” Rear Tyres.
1
2
Rancher
TM
Selector Drive and Auto Drive.
Raider
TM
Rancher
TM
Hydro.
Lawn King
TM
18” and 20” Rear Tyres.
Grass Catcher Mount Support Plate Holes
Figure 3.2a - Towbar Installation
Figure 3.2b Support Bracket
3
4
CAUTION
Modifications to the cutterhead must be
carried out by an Authorised Rover
Service Dealer or Warranty on products
will be void.
3.3 Installing the fan disc assembly
Model 180 (30” Cutterhead only)
1. Raise the front of the ride-on and support so as
to give access to the cutterhead disc.
2. Remove the existing cutter disc by unbolting the
four 3/8” unf. setscrews which hold the cutter
disc to the disc boss assembly.
3. Locate the new Fan Disc Assembly supplied
with the grass catcher and fit this to the
cutterhead assembly in place of the cutter disc
removed in Step 2.
4. Attach the Fan disc assembly to the disc boss
assembly using four 3/8” unf. setscrews. Torque
these setscrews to 46 Nm. (35Ft/lbs).
5. Four fluted blades should be fitted to the Fan
disc assembly to maximise grass cutting and
collecting. These fluted blades are available
from Rover service dealers and agents.
6. Lower the ride-on to the ground and check the
cutterhead tilt and level, as per the Ride-on
Owners Manual.
3.4 Blade Installation
Model 198 (38” Cutterhead)
1. Raise the cutterhead to the high cut position.
2. Raise the front of the ride-on to give access to
the cutterhead discs and blades.
3. Remove the existing blades and replace with
four fluted blades using new blade bolts,
washers and nuts, on each disc. Fluted blades
are available from Rover service dealers and
agents.
4
3
2
1
Ride-on Chassis
Transaxle
Support Bracket
Figure 3.3 - Grass Catcher Support
Figure 3.5 - Internal Frame Assembly
Figure 3.6 - Frame Installation
Figure 3.4 - Mounting the Catcher Assembly
Grass Catcher
Model 108 & 109
Ride-on
Chassis
Transaxle
B
Pivot
Bolts
2664 Ride on Mower Grass Catch 22/5/06 2:31 PM Page 6