


WARNING
Rover Mowers Limited Ride-on Mower Grass Catcher Rover Mowers Limited Ride-on Mower Grass Catcher
Page 1 Page 6
The Rover Ride-on Mower Grass Catcher has been designed to be fitted to and used with the Rover Rancher
TM
,
Raider
TM
and Lawn King
TM
, fitted with either the 30” or the 38” pressed steel cutterheads.
The correct model grass catcher to suit the Rover Rancher
TM
, Raider
TM
and Lawn King
TM
models and cutterhead
combination can be selected from the “Grass Catcher Selection Chart” (See Section 1.1 below)
Some Rover Ride-on Mowers will need to have a towbar fitted and/or the use of a different mount support bracket before
the Rover Grass Catcher can be correctly mounted. These mowers are identified in the chart below by an asterisk *
1. SETTING UP
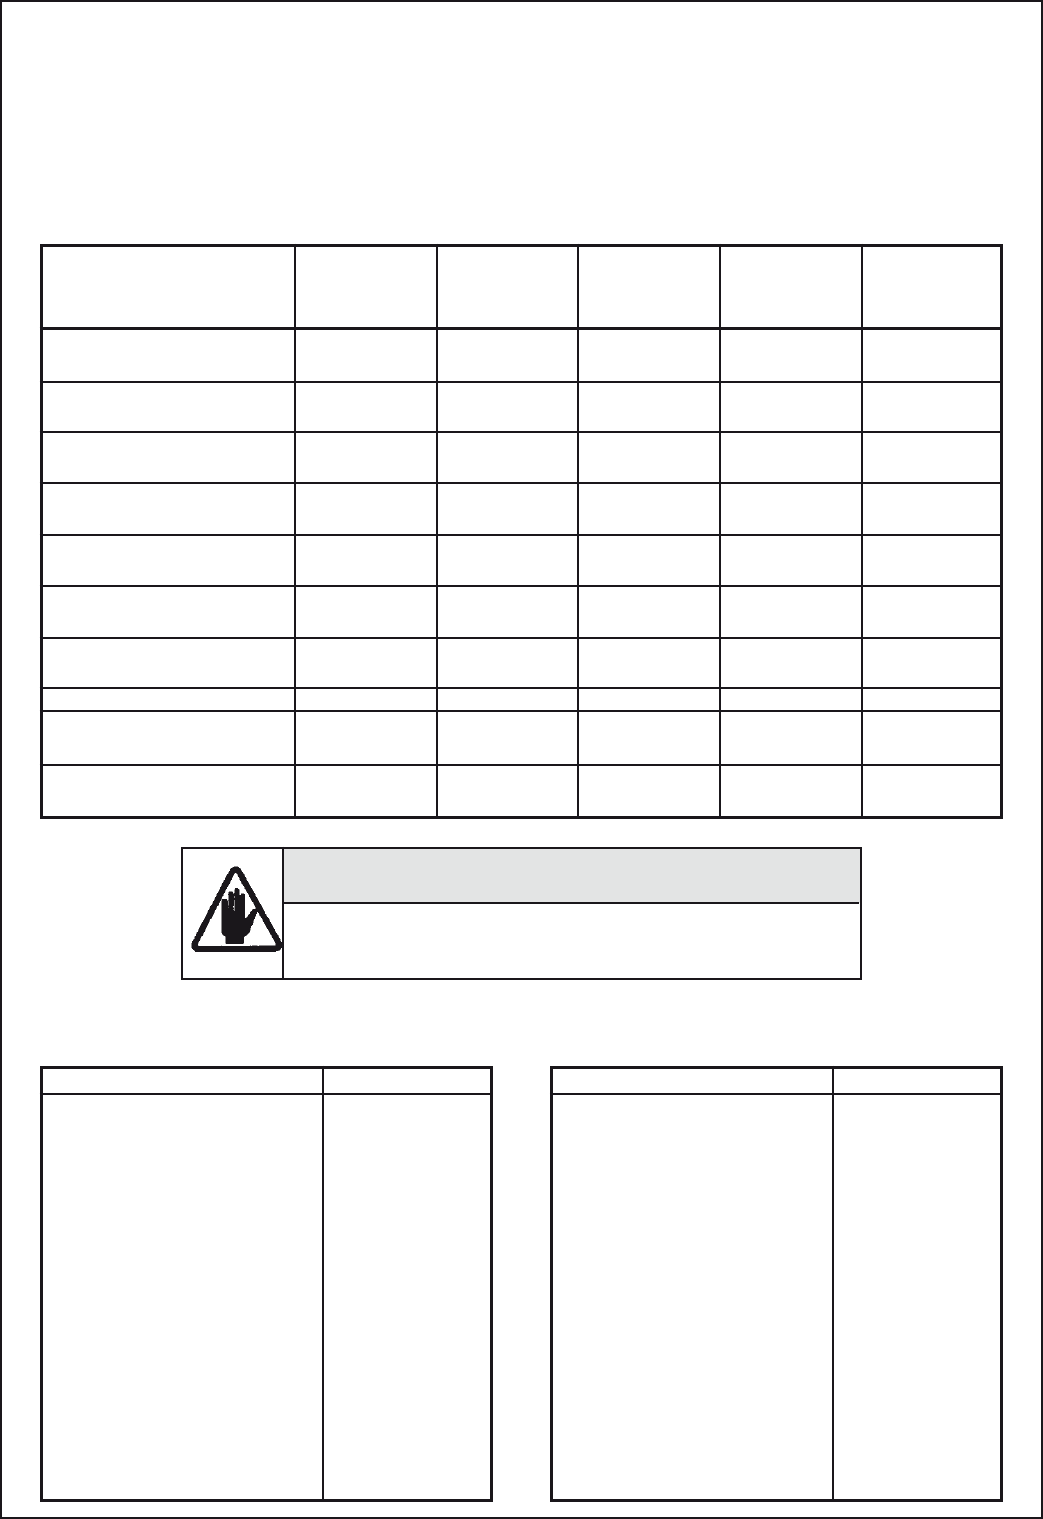
1.1 Grass Catcher Selection
Rover Ride-on Mower Model No.
Cutterhead
Model No.
Catcher
Model No.
Towbar
Model 110
Required
Mount
Support
Bracket
A12942
Rancher Selector Drive
TM
17166 180 108 *
198 109 *
Rancher Selector Drive
TM
17188 180 108 *
198 109 *
Rancher Selector Drive
TM
All model 180 108 *
271** 198 109 *
Rancher Auto Drive
TM
18166 180 108 *
198 109 *
Rancher Auto Drive
TM
18188 180 108 *
198 109 *
Rancher Auto Drive
TM
All model 180 108 *
281** 198 109 *
Rancher Hydro
TM
All model 180 108 *
282**
Raider
TM
4078 180 108 *
Lawn King
TM
(Hydro) 2950 180 108
198 109
Lawn King
TM
(Hydro) All model 180 108
292** 198 109
Transfer tube 1
Chute Assembly 1
Rod-outlet chute 1
Fan discs assembly 1
Grass catcher assembly 1
Support bracket 1
Owner’s manual 1
Side frame 2
Spreader 1
Bolt - 3/8 x 1” unc. 2
Nycloc nut - 3/8” unc. 3
Nyloc nut - 1/4” unc. 4
Screw - 3/16” x 1” unc. RH. 4
Nyloc nut - 3/16” unc. 4
Washer - 3/8” flat 2
Transfer tube 1
Chute Assembly 1
Rod-outlet chute 1
Grass catcher assembly 1
Support bracket 1
Owner’s manual 1
Side frame 2
Spreader 1
Bolt - 3/8” x 1” 2
Nycloc nut - 3/8” unc. 3
Nyloc nut - 1/4” unc. 4
Screw - 3/16” x 1’ unc RH. 4
Nyloc nut - 3/16” unc. 4
Skirt 1
Bolt - 5/16” x 3/4” cuphead 2
Washer - 5/16” flat 2
Nyloc nut - 5/16” unc. 2
Washer - 3/8” flat 4
ItemItem No. SuppliedNo. Supplied
1.2 Loose parts kit - Model 108 (30” Cutterhead) 1.3 Loose parts kit - Model 109 (38” Cutterhead)
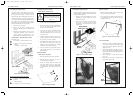
Before proceeding with the assembly of the grass catcher, remove the loose parts kit from the carton.
The Rover Grass Catcher Models 108 and 109 are designed for
front engine ride-on mowers ONLY!
DO NOT FIT 108/109 Grass Catchers to rear engine mowers.
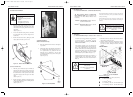
WARNING
Switch the engine off.
Remove the ignition key.
WARNING
Shift the speed selector on the mower
to neutral and apply the parking brake.
4. OPERATION
4.1 To Collect the Grass
1. Ensure that the outlet chute and transfer tube are
correctly positioned in accordance with the
procedures in Section 3.8 and 3.9.
2. Select the required height of cut on the ride-on
mower.
(a) On the first usage of the grass catcher, the
grass to be cut and collected should be taken
down to the required length over several
stages. This will reduce overload on the
grass catcher outlet chute.
(b) Once an area has been cut and the grass has
been collected, this area should be regularly
mowed to maintain an even grass length.
3. Select the ground speed on the ride-on mower.
(a) Initially a slow speed will have to be used
with the grass catcher to assist in grass
pickup and improve efficiency.
(b) Once the grass catcher has been used on an
area which is regularly maintained the
ground speed may be increased.
4. When cutting grass and using the grass catcher
try to maintain an even ground speed over the
area being cut and collected. This ensures a
continuous flow of cut grass being deposited
into the catcher.
5. When cutting and catching wet or damp grass it
is advisable to reduce the ground speed of the
mower. Clogging of either the outlet chute or the
transfer tube may occur if ground speed is too
fast under these conditions.
6. If the outlet chute or transfer tube should clog,
clear as follows:
(a) Disengage the cutterhead drive.
(b) Shift the speed selector to neutral.
(c) Apply the parking brake.
(d) Remove the transfer tube and outlet chute.
(e) Clear the blockage.
7. Where possible, mow in an anticlockwise
direction to avoid objects lying in the grass,
which could damage the outlet chute, transfer
tube or grass catcher.
8. When turning your mower, with the grass
catcher mounted on your ride-on mower, always
visually check that the grass catcher will not
collide with any obstruction that could damage
it.
9. When using the grass catcher, check the transfer
tube from time to time to ensure that grass is
being collected and flowing up the grass transfer
tube.
10. It is recommended that the cutterhead cutting
discs be fitted with fluted blades for maximum
grass cutting and catching efficiency. Fluted
blades are available from Rover service agents
and dealers.
4.2 Emptying the Grass Catcher
1. Disengage the cutter drive on the mower when
the grass catcher is full or the area to be cut and
collected is complete.
2. Select a suitable site where the cut grass is to be
emptied and proceed to the selected site.
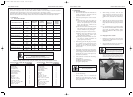
3. Dismount from the mower and empty the grass
catcher by opening the catcher, using the strap at
the back of the grass catcher. (Refer Figure 4.1)
Figure 4.1 - Emptying the Grass Catcher
2664 Ride on Mower Grass Catch 22/5/06 2:31 PM Page 4