


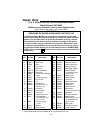

7
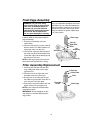
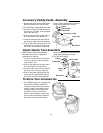
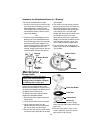
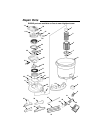
Vac Assembly
1.Locate the lid assembly and the drum/
caster foot/caddy assembly (assembled
earlier).
2. Position the lid assembly with the inlet
of the unit located in line with the drain
cap on the dust drum.
3. To assemble the lid assembly to the
drum/caster foot/caddy assembly, lower
the lid assembly onto the dust drum.
Rotate both latches down until you hear
them snap over the lip of the drum.
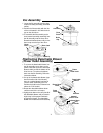
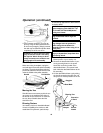
Positioning Detachable Blower
(Power Head Assembly)
Drum Lip
Drum Latch
Drum
Latch
Inlet
Dust
Drain
Cap
Lid
Assembly
Drum
1.To remove the detachable blower from
the lid assembly, press down on the
power head latch under the detachable
blower handle and lift the blower off the
lid of the vac. To replace the blower
back onto the lid assembly, Follow the
instructions below.
2.On top of the detachable blower (oppo-
site the handle side of the blower);
there is a molded plastic lead that is
used to assist assembling the unit.
Position the lead into the indented area
above the “Pull Handle”.
3.Rotate the detachable blower down
until the travel of the unit stops.
4. Lightly press down on the carry handle of
the detachable blower until you hear the
slight “snap” of the power head latch
engaging the blower. The detachable
blower is now latched to the lid assembly.
Power
Head Latch
Indented Area
Molded
Plastic Lead
Pull
Handle
Power Head
Lid Asm.
Drum
Detachable
Blower
Latch
Latch