


11
ASSEMBLY
INLET
COUPLER
HIGH
PRESSURE HOSE
COLLAR
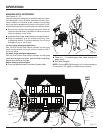
WARNING:
Make sure the nozzle and hose connections are
secure before starting the machine. A non-secured
accessory could become a projectile if not properly
installed which could result in serious injury.
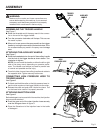
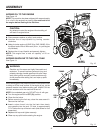
ASSEMBLING THE TRIGGER HANDLE
See Figure 7.
Place the threaded end of the spray wand in the connec-
tor on the end of the trigger handle.
Turn the connector clockwise until it stops. This secures
the wand in place.
When not in use, remove the spray wand from the trigger
handle by turning the connector counterclockwise. Store
the unassembled spray wand in the spray wand storage
area.
ATTACHING THE AUXILIARY HANDLE
See Figure 7.
Place the threaded stud on the end of the auxiliary handle
into the hole in the trigger handle as shown below. Turn
clockwise to tighten.
NOTE: You can install the handle on either the left or right
side of the spray wand, depending on operator prefer-
ence. The handle must always be used to prevent loss
of control and possible serious injury.
To switch sides, loosen the auxiliary handle and rotate to
the opposite side. Tighten securely before use.
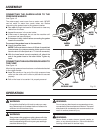
CONNECTING HIGH PRESSURE HOSE TO
TRIGGER HANDLE
See Figure 8.
Pull back and hold the collar on the high pressure hose. In-
sert the inlet coupler on the trigger handle into the collar.
Release the collar and push until it locks into place. Pull
on the hose to be certain it is properly secured.
ATTACHING INJECTION HOSE
See Figure 9.
Before detergent can be used with this machine, the injection
hose must be attached.
Push the open end of the clear injection hose securely
over the fitting as shown in figure 9.
Place the filtered end of the injection hose in the bottle
of detergent.
Fig. 7
AUXILIARY
HANDLE
SPRAY
WAND
TRIGGER
HANDLE
CONNECTOR
Fig. 8
INJECTION HOSE
Fig. 9