


US-16
HEZ2460S/HEZ3060S
9. Maintenance
MA9
(1)
(2)
MA8
(1)
(2)
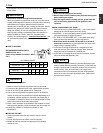
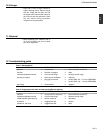
MA7
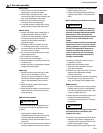
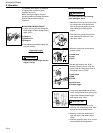
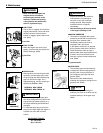
■ BLADE (MA6)
• Place the blade between holders (A)
and (B) while locking the gear shaft by
putting the bar, through the key holes
on the holder (A) and the gearcase.
Use the socket to tighten the blade
mounting bolt.
(1) Blade mounting bolt (Left-handed)
Tightning Torque:
130~150 in-lbs (15~20 N.m)
(2) Holder (B)
(3) Blade
(4) Holder (A)
(5) Bar
• Attention to the direction of the holder
(B)
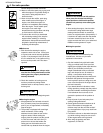
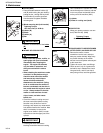
■ INTAKE AIR COOLING VENT
• Never touch the cylinder, muffler, or
spark plugs with your bare hands
immediately after stopping the
engine. The engine can become
very hot when in operation, and
doing so could result in severe
burns.
• When checking the machine to make
sure that it is okay before using it,
check the area around the muffler
and remove any wood chips or
leaves which have attached
themselves to the machine. Failing
to do so could cause the muffler to
become overheated, and that this in
turn could cause the engine to catch
on fire. Always make sure that the
muffler is clean and free of wood
chips, leaves, and other waste
before use.
• Check the intake air cooling vent and
the area around the cylinder cooling
fins after every 25 hours of use for
blockage, and remove any waste which
has attached itself to the machine. Note
that it is necessary to remove the
engine cover shown in (MA7) in order
to be able to view the upper part of the
cylinder.
• If waste gets stuck and causes
blockage around the intake air cooling
IMPORTANT
WARNING
IMPORTANT
vent or between the cylinder fins, it may
cause the engine to overheat, and that
in turn may cause mechanical failure
on the part of the machine. (MA7)
(1) cylinder
(2) intake air cooling vent (back)
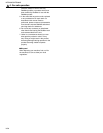
■ PROTECTOR
• When you replace protector, use new
bolt (T3207-24130). (MA8)
Tightning Torque:
35~52in-lbs (4.0~6.0N.m.)
■ PROCEDURES TO BE PERFORMED
AFTER EVERY 100 HOURS OF USE
1. Remove the muffler, insert a
screwdriver into the vent, and wipe
away any carbon buildup. Wipe away
any carbon buildup on the muffler
exhaust vent and cylinder exhaust port
at the same time.
2. Tighten all screws, bolts, and fittings.
3. Check to see if any oil or grease has
worked its way in between the clutch
lining and drum, and if it has wipe it
away using oil-free, lead-free gasoline.
(1)
(2)
(3)
(4)
(5)
MA6