


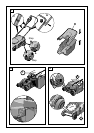

Height of Cut Adjustment
Stop, release switch lever before adjusting height.
Your machine has seven settings which give the
following approximate height of cuts;
1 = 18 mm 2 = 22 mm 3 = 27 mm
4 = 32 mm 5 = 40 mm 6 = 50 mm 7 = 65 mm
Remove the grassbox to aid adjustment (see
‘Grassbox’).
Press and hold the height of cut button Fig 3.
Lift up or push down the machine until the required
height is indicated Fig 3.
Release the height of cut button to lock the height
of cut setting, a click will be heard when locked.
Starting and Stopping
To aid starting, push handle down to lift front wheels.
Starting
Press and hold the safety button Fig 4.
Squeeze the switch lever towards the handle.
Release the safety button Fig 4.
Stopping
Release the switch lever Fig 4.
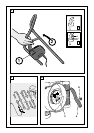
Mowing
Place the machine on the edge of the lawn, as
close to the power point as possible. Work away
from the power point Fig 5.
When mowing DO NOT ALLOW THE MOTOR TO
LABOUR, particularly in heavy conditions. When the
motor labours the speed of the motor drops and
you will hear a change in the motor sound, when this
occurs stop mowing, release switch lever and RAISE
THE HEIGHT OF CUT. Failure to do so could damage
the machine.
After Mowing/Storage
Clean the exterior of the machine thoroughly using a
soft brush and cloth. Do not use water, solvents or
polishes. Remove all grass and debris, especially from
the ventilation slots.
Turn the machine on its right side and clean the blade
area. If grass cuttings are compacted in the blade
area, remove with a wooden or plastic implement.
Store the machine in a dry place. Do not place
other objects on top of the machine.
To aid storage loosen the handle wheels Fig 1C and
fold the handles.
Ensure cable is not trapped when folding/unfolding
top handles, DO NOT DROP THE HANDLES.
Maintenance
Stop, remove plug from the power supply and
remove the grassbox.
Note: To ensure long and reliable service, carry out
the following maintenance regularly.
Regularly check for obvious defects such as loose,
dislodged or damaged blade, loose fixings, and
worn or damaged components. Check that covers
and guards are undamaged and correctly fitted.
Blade Maintenance
Stop, remove plug from the power supply and
remove the grassbox.
Turn the machine on its right side Fig 6 and inspect
the blade and fan; if blunt or damaged fit a new
blade.
Use the following procedure to remove and replace
the blade.
Hold the blade Fig 6A using gardening gloves, use a
spanner (not provided) to remove the blade nut Fig
6B and blade.
Before fitting the new blade, ensure that the fan
Fig 6C is fitted correctly on the shaft. It will fit in only
one position.
Fit the blade Fig 6A and the blade nut Fig 6B. Ensure
that the blade is the correct way up and tighten the
blade nut firmly.
0
I
1
2
0
I
1
2
0
I
1
2