


Pro-8a 2400 Air – Pro-8a 1200 Air
14
www.profoto.com
Pro-8a 2400 Air – Pro-8a 1200 Air
15
www.profoto.com
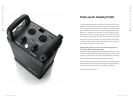
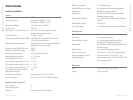
Settings
1. Use the Modeling Light Control [7] to select MAX PROP, MAX, PROP or ½ PROP. Press the
Modeling Light switch [9] to turn on the modeling light.
2. Use Flash Light Energy Control A [8] and B [19] to set the energy levels.
3. Use the Ready Control [16] to select BEEP-DIM, BEEP, DIM or OFF.
4. Use the Speed Control [18] to select MAX, 75%, 50% or 25%.
Sync via cable
1. Connect a sync cord from the camera to one of the Sync Connectors [2] on the generator.
1. Connect a sync cord from the camera to one of the Sync Connectors [2] on the generator.
2. Connect another sync cable from the flash meter to the free Sync Connector [2].
Sync via Photocell / IR-slave
1. Connect an IR transmitter to the camera.
2. Turn the Sync Control [5] to SLAVE.
Sync via radio (Profoto Air)
1. Connect an Air Remote or Air Sync unit to the camera.
2. Turn the Sync Control [5] to RADIO.
3. Pro-8a is now ready to flash, with the selected radio channel.
Wireless remote control
For Air Remote control, both radio channel and group have to be set. The group can be set
individually for each lamp head. For wireless use with Profoto Studio 2 and AIR USB, only
radio channel has to be set.
Changing radio channel and group settings:
1. Turn the Sync Control [5] to SET.
2. The radio channel and group setting for the individual lamp head is shown separately
in Flash Light Energy Display A [8] or B [19] as a radio channel number (1-8) followed by a
group letter (A-F).
3. Turn Flash Light Energy Control A [8] or B [19] clockwise/counter-clockwise to increase/
decrease the radio channel number.
4. Push and turn Flash Light Energy Control A [8] clockwise/counter-clockwise to increase/
decrease the group setting for lamp head A [4].
5. Push and turn Flash Light Energy Control B [19] clockwise/counter-clockwise to
increase/decrease the group setting for lamp head B [15].
6. Turn the Sync Control [5] to RADIO.
Turn off generator
1. The modeling light, energy level, radio channel and group settings are automatically
saved as soon as they are changed and will be available at start up.
2. Press the On switch [13] to turn off the power.
3. The Power Supply Indicator [12] will be red, indicating that the generator is receiving
power but is in standby mode.
4. Remove the power cable.