


7
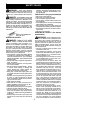
ADJUSTING THE CUTTING ANGLE
WARNING: Never attempt to adjust
the cutting angle when the engine is running.
Always release t he throttle trigger, wait until
the bladestops moving,movethepowerhead
ON/OFF switch to the OFF position, and dis-
connect spark plug (or disconnect from pow-
er source) before making adjustments.
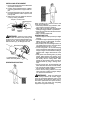
Adjustthe ang leof thetrimmerto suitthearea
you are trimming.Adjust theblade as follows:
1. Use one hand to grasp t he angle adjust-
ment holder.
2. Loosen the fixed screw by using awrench
to turn it counterclockwise.
3. When the blade is in the desired position,
turn the fixed screw clockwise to secure
the blade.
Angle Adjustment
Track
Fixed
Screw
Angle Adjustment Holder
MAINTENANCE
WARNING: Always stopunit anddis-
connect spark plug wire (or disconnect pow-
erheadfrompowersource) beforeperforming
maintenance.
BLADE MAINTENANCE
WARNING: The blade m oves mo-
mentarily after the trigger is released.. To
avoid serious injury , make sure the bladehas
stopped moving and disconnect the spark
plug (or disconnect powerhead from power
source) before performing work on theblade.
WARNING: Always replace a blade
that is bent, warped, cracked, broken, or
damaged in any other way. Never attempt to
straighten and reuse a damaged blade. Use
only specified replacement blade. W ear pro-
tective gloves when handling or performing
maintenance o ntheblade tohelpavoidinjury.
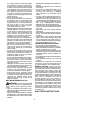
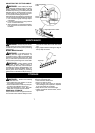
S For easier operation and longer blade life,
lubricate the blade before and after each
use.
S Apply a light machine oil along the edge of
the top strap as shown.
Top Strap
OIL
STORAGE
WARNING: Perform the following
steps after each use:
S Allow attachment and gearbox to cool be-
fore storing or transporting.
S Position attachment so that any sharp ob-
ject cannot accidentally cause injury.
S Store the attachment in a dry, well venti-
lated a rea out of the reach of children.
SEASONAL STORAGE
Prepare attachmentfor storageat endofsea-
son o rif i twill notbeusedfor 30days o rmore.
If your hedge trimmer attachment is to be
stored for a period of time:
S Clean the entire attachment.
S Store in a clean dry area.
S Clean all parts and check for damage.
Have damaged parts repaired or replaced
by an authorized service dealer.
S Keep all nuts, bolts, and screws tight.
S Lightly oil external m etal surfaces, includ-
ing the blade.