


6
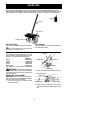
INSTALLING ATTACHMENT
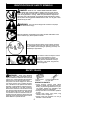
1. Removetheshaftcapfromtheattachment
(if present) and discard.
2. Position locking/release button of attach-
mentinto guiderecess ofuppershaftcou-
pler.
3. Push theattachment into the coupler until
the locking/release button snaps into the
primary hole.
4. Before using the unit, tightenthe knob se-
curely by turning clockwise.
Coupler
Primary Hole
Upper
Shaft
Locking/
Release
Button
Attachment
Guide Recess
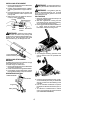
WARNING: Make sure the l ocking/
release button is locked in the primary hole
andtheknob issecurely tightened beforeop-
erating the unit . Using the wron g hole could
lead to serious injury or damage to the u nit.
Locking/Release
Button in Primary Hole
INSTALLING ATTACHMENT
HANGER
Anattachmenthanger isprovidedforstorage
when attachment is not in use.
To install hanger on attachment:
1. Removetheshaftcapfromtheattachment
(if present) and discard.
2. Pressandholdthelocking/releasebutton.
3. Pushhanger ontotheattachment untilthe
locking/releasebuttonsnapsintothehole.
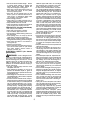
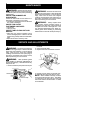
OPERA TING POSITION
Heavy Shoes
Long Pants
Eye Protection
ALWAYS WEAR:
WARNING: Toavoid personal injury ,
never carry thecultivatorwhile theunitisrun-
ning.
WARNING: The gearbox gets very
hot after extended periods of use. To avoid
burns, do not touch the gearbox until it has
been allowed to cool.
CULTIVATING
1. Move the cultivator to the work area prior to
starting the engine/motor .
2. With the engine/motor running and the
tines off theground, press thethrottletrig-
ger to increase the engine speed.
3. Holdtriggerhandleandassisthandlefirm-
ly. Slowly lower the cultivator until t he
tines make contact with the ground.
4. As unitbegins cultivating, pullback on the
unit so that the tines can penetrate t he
ground.
5. Oncethegroundhasbeenbroken,contin-
ueatamoderatepaceuntilyouarefamiliar
with the controls and the handling of the
cultivator .
6. Pull the cultivator backwards to improve
thedepthofcultivationandreduceyouref-
fort.
7. To cultivate in confined areas or narrow
rows, remove the left and right outer tines
(see TINE REPLACEMENT).