


6
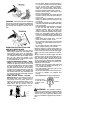
WARNING:
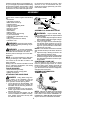
Donot useany blades, or
fastening har dw ar e other than the w asher s and
nuts show n i n the following illustr atio n s. Th e se
parts must be provided by Poulan/Weed Eater
and installed as shown below. F ailure to use
proper par ts can cause the blade to fly off and
seriously hurt you or others.
NOTE:
The dustcup and r etaining w asherare
located on thegearbox shaftand notin theparts
bag. All o therfasteners m entioned inthe follow-
ing assembly steps are in the parts bag.
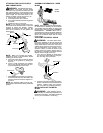
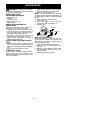
1. Remove the retaining washer from the
threaded shaft of the gearbox. Leave the
dust cup on the shaft.
2. Install the blade and the retaining washer
over the threaded shaft.
3. Make sure the raised part of the retaining
washer is facing the gearbox and the
raised area fits into the hole in the center
of the blade.
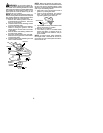
4. Slide the blade and r etaining washer onto
the shaft of the gearbox.
5. Place the cupped washer onto the shaft.
Make sure the cupped side of the washer
is toward the blade.
6. Install the blade nut bythreading onto the
shaft counterclockwise.
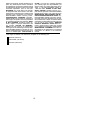
Shield
Blade
Retaining
Washer
Dust Cup
Cupped
Washer
Nut
Threaded Shaft
Gearbox
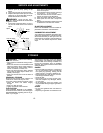
NOTE:
Make sure all parts are in place as il-
lustrated, and the blade is sandwiched betw een
the dust cup and the ret aining washer. Ther e
should be no space between the blade and the
dust cup or the retaining washer.
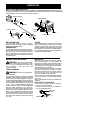
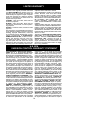
7. Align hole in dust cup with hole in side of
gearbox by rotating the blade.
8. Insert a small screwdriver into aligned
holes. This will keep the shaft from turn-
ing while tightening the blade nut.
Screwdriver
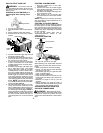
9. Tightenblade nutfirmly w itha wr enchwhile
holding s crewdriver in position.
10. Remove the screwdriver.
11. Turn blade by hand. If the blade binds
against the shield, or appears to be un-
even, the blade is not centered, and you
must reinstall.
NOTE:
To r em ove blade, insert screwdr iver
into al igned holes. Un-thread the nut and re-
move parts. Be sur e to store par ts and instruc-
tions for future use.