12
CHECK FOR LOOSE FASTENERS
AND PARTS
S Bar Clamp Nuts
S Chain
S Bar Adjusting Screw
CHECK CHAIN TE NSION
WARNING: Wear protective
gloves when handling chain. The chain
is sharp and ca n cut you even when it is
not moving.
Chain ten sion is very import ant. C hain
stretches during use. This i s especially
trueduringthe fi rstfew timesyou useyour
saw . Always check chain tension each
ti me you use your saw .
1. Unpl ug unit from the p ower source.
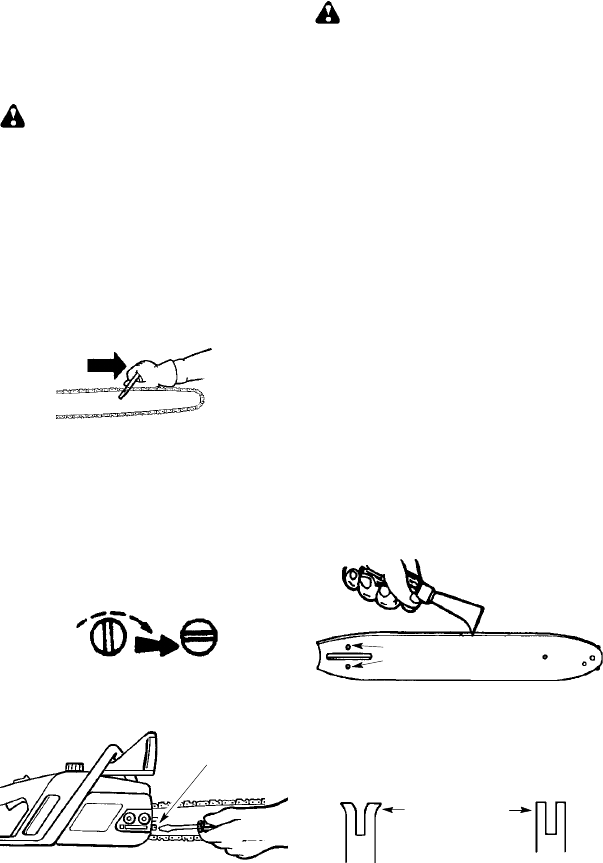
2. Use a screwdr iver to move chain
around guide bar to ensure k inks do
not exist. The chain should rotate
freely .
NOTE: It is recommended that the saw
be turned upside down for cha in
tensioning.
3. Loos en bar clamp nuts until they are
finger tight against the bar clamp.
4. Turn the adjus t ing screw clockwise
until the chain solidl y contacts bottom
of guide bar r ai l . Then, tur n adjusting
screw an ad di t i onal 1/4 tur n. This is
correct chai n tension setting.
Adjusting Screw -- 1/4 Turn
NOTE: To t ighten the chain, turn th e ad-
just ing screw clockwise; t o loosen the
chain , turn the adjusti ng screw counter-
clockwi se .
Adjusting Screw
5. Check t he tension by lifting the chain
fr om the guide bar. Remove s ome of
the stiffness in the chain by pulling
downand lettinggo ofthe chainsever-
al times.
6. Conti nue tur ni ng t he adjusti ng scr ew
until t he tension is correct ( see step 4).
7. T i ght en bar clamp nut s wit h a wrench.
8. Recheck chain tension.
WARNING: If the saw is operated
with a loose chain, the chain could jump
off the guide bar and resultin serious in-
jury.
CHECK CHAIN SHARPNESS
A sharp chain makes woodc hips. A dull
chain makes a sawdust powder and
cuts slowly. See
CHAIN SHARPENING in
the
SERVICE AND ADJUSTMENTS
section.
CHECK GUIDE BAR
Conditi ons which requir e guide bar main-
tenance:
S Saw cuts to one side or at an angle.
S Saw has to be forced t hr ough the cut.
S Inadequate supply ofoilto the barand
chain.
Check the condit i on of the guide bar each
ti me the chain is sharpened. A worn gui de
bar will damage the chain and make cut-
ti ng diff i cul t .
Aft er each use, with uni t disconnected
fr ompower source,clean allsawdustfrom
the guid e bar and sprocket hole.
To maintain guide bar:
S Disconnect the chain s aw from the
power source.
S Loosen and remove bar clamp nut s.
Remove bar and chain from saw.
S Clean the oil holes and bar groove af-
ter each 5 hours of operation.
Remove Sawdust From
Guide Bar Groove
Oil Holes
S Burring of guide bar rails is a normal
process of rail wear. Remove these
burrs with a flat file.
S When rail top is uneven, use a flat file
to restore square edges and sides.
Correct GrooveWorn Groove
File Rail Edges
and Sides
Square
Replace the guide bar when the gr oove is
worn, the guide bar is bentor cr ack--ed, or
when excess heating orburring ofthe r ai ls
occur s. I f repl acem en t i s necessar y, use
only t he guidebarspecified f oryoursawin
the repair part s listor on t h e decal located
on t he chain saw.


