11
OPERATING TIPS
S Check chain tension before first use and
after 1 minute of operation. See CHAIN
TENSION in the ASSEMBLY section.
S Cut wood only. Do not cut metal, plastics,
masonry , n on-wood b ui lding m at erials, e tc.
S Stop the saw if the chain strikes a for eign
object. Inspect the saw and repair or re-
place parts as necessary.
S Keep the chain out of dirt and sand. Even a
small amount of dirt will quickly dull a chain
and th us increase the p ossibility of kickback.
S Practice cutting a few sm all lo gs using the
following techniques t o get t he“feel” of us-
ing your saw before you begin a major
sawing operation.
S Squeeze t he throttle trigger and a llow the
engine to reach full speed before cutting.
S Begin cutting with the saw frame
against the log.
S Keep the engine at fullspeed the entire
time you are cutting.
S Allowthe chainto c utfor you. Exert only
light downward pressure. If you force
the cut, damageto thebar,chain, oren-
gine can result.
S Release the throttle trigger as soon as
the cut is completed, allowing the en-
gine to idle. If you run the saw at full
throttle without acutting load,unneces-
sary wear can occur to the chain, bar,
and engine. It is recommended that
the engine not be operated for lon-
ger than 30 seconds at full throttle.
S To a void l osing control when cut is com-
plete, do not put pressure on saw at end
of cut.
S Stop the engine before setting the saw
down a fter cutting.
TREE FELLING TECHNIQUES
WARNING: Check for broken or dead
branches which can fall while cutting causing
serious injury. Do not cut near buildings or
electrical wires i f you do not know t he direction
of tree fall, n or cut at night since you will not be
ale to see well, nor during bad weather such as
rain, snow , or strong winds, etc. If the tree
makes contact with any utility line, the u tility
company should be notified immediately .
S Carefully planyour sawingoperation inad-
vance.
S Clearthe workarea. You needa cleararea
all aroundthe tree so you can have secure
footing.
S The chain saw operator should keep on
the uphill side of the terrain as the tree is
likely toroll orslidedownhill afterit is felled.
S Study the natura l condi tions that can cause
the tree to fall in a particular direction.
Natural conditions that can cause a tree to
fall in a particular direction include:
S The wind dir ection and speed.
S The lean of the tree. The lean of a tree
might not be apparent due to uneven or
sloping terrain. Use aplumb or level tode-
termine the direction of tree lean.
S Weight and branches o n one side.
S Surrounding tr ees and obstacles.
Look for decay and rot. If the trunk is rotted,
it can snap and fall toward the operator .
Check for broken or dead branches which
can fall on you while cutting.
Make sure there is enough room for the t ree to
fall. Maintain a distance of
2-1/2 tree lengths
from the nearest person or other o bjects. En-
gine noise can drown out a warning call.
Remove dirt, stones, loose bark, nails, sta-
ples, and w irefrom thetree wherecuts areto
be made.
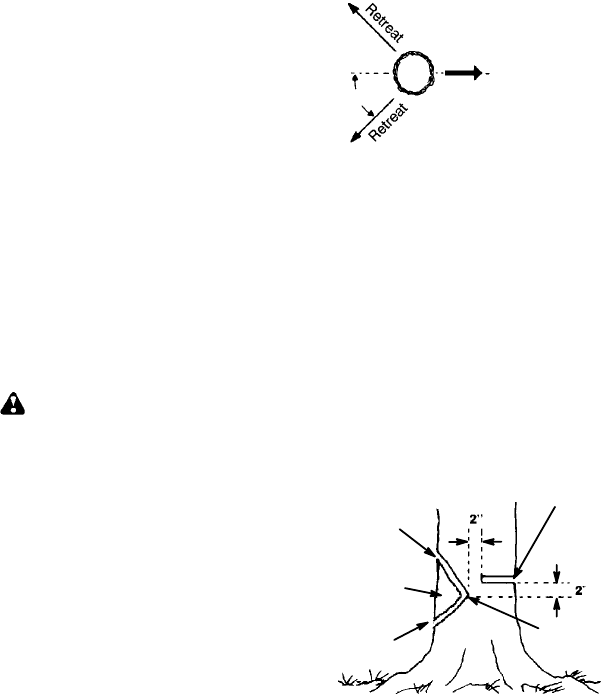
Plan a clear r e treat path to the rear and diag-
onal t o the line of fall.
Direction o f Fall
45_
Plan a clear retreat path
FELLING LARGE TREES
(6 inches (15 cm ) in diameter or larger)
The notch method is used to f ell large trees.
A notch is c ut on the s ideof thetreein thede-
sired direction of fall. After a felling cut is
made on the opposite side of tree, the tree
will tend to fall into the not ch.
NOTE: If the tree has large buttress roots,
removethem before making the notch. If us-
ing saw to r emo ve but tress roots, keep saw
chain from contacting groundto prevent dull-
ing of the chain.
NOTCH CUT AND FELLING THE
TREE
S Make notch cut by cutting the top of the
notch fi rst. Cut through
1/3 of the diameter
ofthe t ree. N extcomplete thenotch bycut-
ting the bottom of the notch. See illustra-
tion. Once the notch is cut remove the
notch of w ood from the tree.
Notch
First cut
Second cut
Final (felling) cut here, 2 inches
(5 cm) above center of notch.
Hinge
S After removing the wood from the notch,
make the felling cut on the opposite side of
the n otch. T his is done by mak ing a cut abou t
two inches (5 cm) higher than the center of
the notch. This will leave enough uncut wood
between the felling cut and t he notch to form
a hinge. This hinge will help p revent the tree
from falling in the wrong direction.


