15
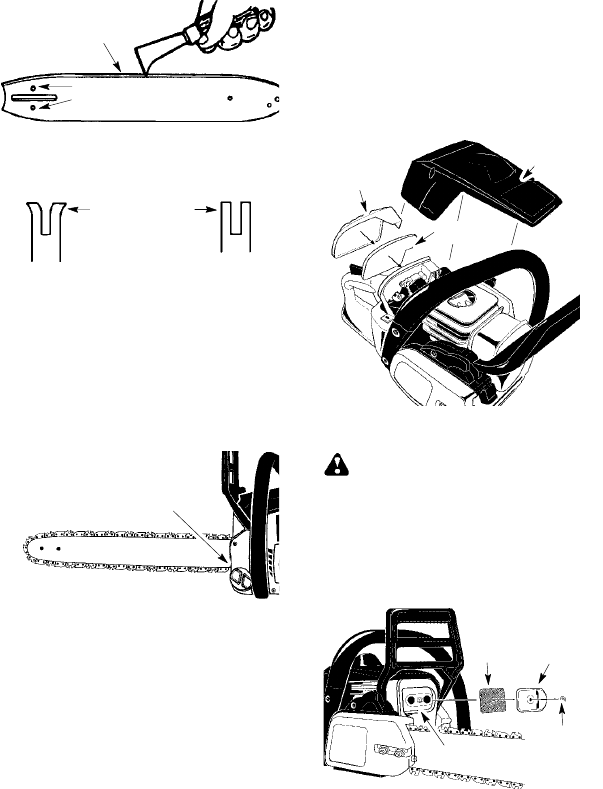
S Clean the oil holes and bar groove after
each 5 hours of operation.
Remove Sawdust From
Guide Bar Groove
Oil Holes
S Burring of guide bar rails i s a normal
process o f rail wear. Remove these burrs
with a flat file.
S When railtop is uneven,usea flatfile tore-
store square edges and sides.
Correct GrooveWorn Groove
File Rail Edges
and Sides
Square
Replace guide bar when the groove is worn,
the guide bar is bent or cracked, or when ex-
cess heating or burring of the rails occurs. If re-
placement is necessary, use only the guide bar
specified for your saw in the repair parts list or
on the decal located on the chain saw.
CHECK FUEL MIXTURE LEVEL
S See FUELING ENGINE under the OP-
ERA TION section.
LUBRICATION
Bar Oil
Fill Cap
S See GUIDE BAR AND CHAIN OIL under
the OPERATION section.
INSPECT AND CLEAN UNIT AND
DECALS
S After each use, inspect complete unit for
loose or damaged parts. Clean the unit and
decals using a damp cloth with a mild deter-
gent.
S Wipe off unit with a clean dry cloth.
CHECK CHAIN BRAKE
See CHAIN BRAKE in the OPERATION
section.
CLEAN AIR FILTER
CAUTION:
Donot cleanfilterin gasolineor
other flammable solvent to avoid creating a
fire hazard or producing harmful evaporative
emissions.
Cleaning the air filter:
A dirty air filter decreases the life and perfor-
mance of the engine andincreases fuel con-
sumption and harmful emissions. Always
clean your air filter after 10 tanks of fuel or 5
hours of oper ation, whichever comes first.
Clean more frequently in dusty conditions.A
used air filter can never be completely
cleaned. It is advisable to replace your air fil-
ter witha new oneafter e very 50hours ofop-
eration, or annu ally, whichever comes first.
1. Loosen 3 screws on cylinder cover .
2. Remove cylinder cover .
3. Remove air filter cover and air filter.
4. Cleanthe airfilterusinghot soapywater.
Rinsewithcleancool water.Air d rycom-
pletely before reinstalling.
5. Reinstall air filter and air filter cover.
6. Reinstall cylinder cover and 3 screws.
Tighten securely.
Air Filter
Air Filter
Cover
Cylinder
Cover
INSPECT MUFFLER AND SPARK
ARRESTING SCREEN
WARNING: Themuffler onthisprod-
uct contains chemicals knowntothe State of
California to cause cancer.
As the unit is used, carbon deposits build up
on the muffler and spark arresting screen,
and must be removed t o avoid creating a fire
hazard or a ffecting engine performance.
Replacethe spark arresting screen if breaks
occur.
Nut
Exhaust
Outlet
Cover
Muffler
Spark
Arresting
Scree n
CLEANING THE SPARK ARREST-
ING SCREEN
Cleaning is required every 25 hours of op-
eration or annually, whichever comes first.
1. Loosen and r emove the nut fromthe e x-
haust outlet cover .
2. Remove the exhaust oulet cover.
3. Remove spark a rresting screen.Handle
screen carefully to prevent damage.
4. Clean the spark arresting screen gently
with a wire brush. Replace screen if
breaks are found.
5. Replace any broken or cracked muffler
parts.


