11
LIMBING
S Limb a tree only after it is cut down.
S Leave thelarger limbs underneath the
felled tree to support the tree as you
work.
S Start at the base of the felled tree and
work toward the top, cutting branches
and limbs. Remove small limbs with
one cut.
S Keep the tree between you and the
chain.
S Remove larger branches with the cut-
ting techniques described in
BUCKING
WITHOUT A SUPPORT.
S Always use an overcut to cut small
and freely hanging limbs. Undercut-
ting could causelimbstofall andpinch
the saw.
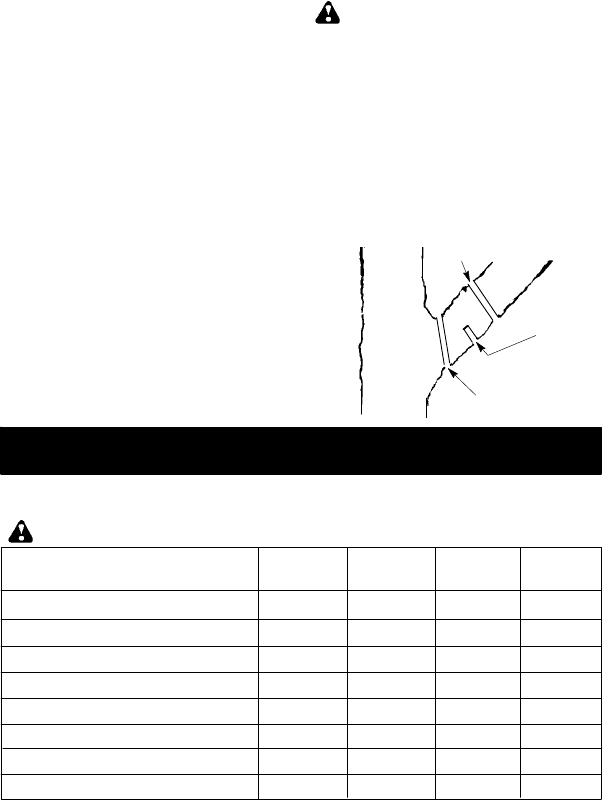
PRUNING
WARNING: Limit pruning to limbs
shoulder height or below. Do not cut if
branches are higherthan yourshoulder.
Get a professional to do the job.
S Make you r first cut
1/3 of the way
throughthe bottomof thelimb.Thiscut
will make the limb sag so that it falls
easily on the second cut.
S Next make a second cut all the way
through the limb.
S Finish the pruning operation by using
an overcut so that the stump o f the
limb protrudes 1 to 2 inches from the
trunk of the tree.
First cut
1/3 of way
Second cut
3rd cut 1 to 2 in.
from trunk of tree
MAINTENANCE
CUSTOMER RESPONSIBILITIES
Fillindatesasyoucomplete
regular service
Check for damaged/worn parts
Check for loose fasteners/parts
Check chain tension
Check chain sharpness
Check guide bar
Inspect and clean unit & labels
Before
Use
After
Use
Every
15 mi n.
Service
Dates
n
n
n
n
n
nCheck bar and chain oil level
Clean guide bar groove
n
n
n
WARNING: Disconnect power s ource before performing maintenance.
GENERAL RECOMMENDATIONS
The warranty on this unitdoes notcover
items that have been subjected to oper-
ator abuse or negligence.To receive full
value from the warranty, the operator
must maintain unit as instruct- ed in this
manual. Various adjustments will need
to be made periodically to properly
maintain your unit. Improper mainte-
nance may c ause d amage to the unit
and possibleinjuryto the operatororby-
standers.
CHECK FOR DAMAGED OR
WORN PARTS
Contact an authori zed service dealer for
repl acement of damaged or worn parts.
NOTE: It is normal for a small amount of
oil to appear under the saw after motor
stops.Do not confuse this with a leaking
oil tank.
S Trigger Switch -- Ensure the trigger
switch functions properly by squeez-
ing and ho lding the trigger switch.
Make sure motor starts and stops.


