


12
INSPECT ANDCLEAN UNIT AND LA-
BELS
S
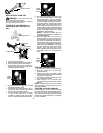
After each use, inspect complete unit for
loose or damaged parts. Clean the unit and
labels using a damp cloth with a mild deter-
gent.
S
Wipe off unit with a clean dry cloth.
CLEAN AIR FILTER
A dirty air filter decreases engine perform-
ance and increases fuel consumption and
harmful emissions. Always clean after every
5 hours of operation.
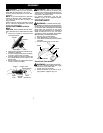
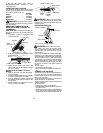
1. Clean the cover and the area around it to
keep dirt from falling into the carburetor
chamber when the cover is removed.
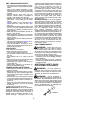
2. Remove parts by pressing button to re-
lease air filter cover.
NOTE:
To avoid creating a fire hazard or
producing harm ful evaporative emissions, do
not clean filter in gasoline or other flammable
solvent.
3. Wash the filter in soap and water.
4. Allow filter to dry.
5. Add a few drops of oil to the filter;
squeeze the filter to distribute oil.
6. Replace parts.
Air Filter
Air Filter
Cover
Button
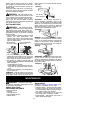
REPLACE SPARK PLUG
Replace the spark plug each year to ensure
the engine starts easier and runs better. Set
spark plug gap at
0.025 in. Ignition timing is fixed and
nonadjustable.
1. Twist, then pull off spark plug boot.
2. Remove spark plug from cylinder and
discard.
3. Replace with Champion RCJ-6Y spark
plug and tighten securely with a 3/4 in.
socket wrench.
4. Reinstall the spark plug boot.
SERVICE AND ADJUSTMENTS
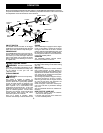
REPLACING THE L INE
1. Remove spool by firmly pulling on tap
button.
2. Clean entire surface of hub and spool.
3. Replace with apre-wound spool, o rcut two
lengths of
12-1/2
feet of 0.080
!
(2 mm) di-
ameter Poulan/Weed Eater
r
brand line.
WARNING:
Never use wire, rope,
string, etc., which canbreak offand become a
dangerous missile.
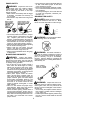
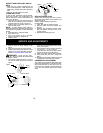
4. Insert ends of the lines about 1/2 inch (1
cm) into the small holes on the inside of
spool.
Small
Holes
Spool
Hub
Line in Notch
Line in Notch
Line exit holes
5. Wind the line evenly and tightly ont o the
spool. Wind in the direction of the arrows
found on the spool.
6. Push the lines into the notches, leaving 3
to 5 inches (7 -- 12 cm) unwound.
7. Insert the lines into the the exit hol es in
the hub as shown in the illustration.
8. Align the notches with the line exit holes.
9. Push spool into hub until it snaps into
place.
10. Pull the lines extending outside of thehub
to release the lines from the notches.
CARBURETOR ADJUSTMENT
Your carburetor is equipped with limiter caps.
Carburetor adjustment is a complicated task.
We recommend that you take your unit to an
authorized s ervice dealer. Damage will occur
if you turn the needles beyond the limiter
stops.