


14
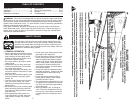
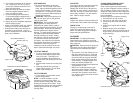
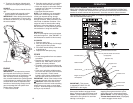
Chassis
cover
Screw
SERVICE AND ADJUSTMENTS
CAUTION: Before performing any service and adjustments:
1. Stop engine.
2. Make sure the rotating lines and all moving parts have completely stopped.
3. Disconnect spark plug wire from spark plug and place where it cannot come in con-
tact with plug.
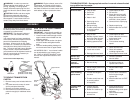
TO REMOVE / REPLACE TRIMMER
HEAD DRIVE BELT
1. Remove screw at front of chassis
cover.
2. Lift cover up and away from trimmer.
Engine
pulley
Debris shield screws
Handle knob
Upper handle
TRIMMER
TO AD JUST TRIMMING HEIGHT
See “TO AD JUST TRIMMING HEIGHT” in
the Op er a tion sec tion of this manual.
TO ADJUST HANDLE (IF EQUIPPED)
The upper handle may be adjusted to dif-
ferent height positions.
• Loosen handle knob only enough to
allow the upper handle to pivot to the
desired position.
• Tighten handle knob securely.
NOTE: The handle knob and bolt may be
reversed for left handed operation.
3. Remove the two (2) screws on sides of
trimmer securing the debris shield.
4. Turn trimmer on its side with car bu re tor
and fuel cap up.
5. Remove the two (2) screws on under-
side of trimmer securing the debris
shield.
6. Slide the debris shield rearward and
remove.
7. Remove belt from engine pulley on
crankshaft.
TECUMSEH MODELS
BRIGGS & STRATTON MODELS
Debris shield screws
Engine
pulley
8. Remove belt from trimmer head pulley.
9. Note the position of the control cable
and idler return spring, then remove
idler assembly from chassis and re-
move belt and idler from trimmer.
10.Remove belt from idler assembly by
re mov ing bottom belt keeper and idler
pulleys.
7
HOW TO USE YOUR TRIMMER
ENGINE SPEED
The engine speed is controlled by a
throttle located on the side of the upper
handle. Fast position is for starting and
normal trimming. Slow is for light trimming
and fuel economy. Stop is for stopping
the engine.
The operation of any trimmer can result in foreign objects thrown into
the eyes, which can result in severe eye damage. Always wear safety
glasses or eye shields while operating your trimmer or per form ing any
adjustments or repairs. We rec om mend a wide vision safety mask over
spectacles or standard safety glasses.
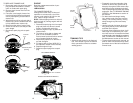
TRIMMER HEAD DRIVE CONTROL
Your trimmer is equipped with a trim-
mer head drive control bar and lever (if
equipped) which require the operator to be
positioned behind the trimmer handle to
operate the trimmer.
• Trimmer head rotation is controlled by
holding the trimmer head control bar
down to the handle. If equipped with
a lever, push the drive control lever
forward until it clicks; then release the
lever.
• Trimmer head rotation will stop when
the control bar is released.
STOP
BEFORE STARTING ENGINE
ADD OIL
Your trimmer is shipped without oil in the
engine. For type and grade of oil to use,
see the engine maintenance section in
your engine manual.
CAUTION: DO NOT overfi ll engine with
oil, or it will smoke on startup.
1. Be sure trimmer is level and area
around oil fi ll is clean.
2. Remove oil dipstick from oil fi ll spout.
Make sure that rim of spout is clean.
Trimmer head control bar
TO ENGAGE
TRIMMER HEAD
TRIMMER HEAD
DISENGAGED
Drive control lever
(if equipped)
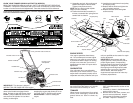
TO ADJUST TRIMMING HEIGHT
(IF EQUIPPED)
CAUTION: Stop the engine and wait
for all moving parts to stop. Disconnect
spark plug wire from spark plug and place
wire where it cannot come in contact with
plug.
The height of cut can be set to six (6) dif-
ferent positions ranging from 1-1/2 inches
to 3 inches. Recommended cutting height
for the average yard is 2 inches.
1. To adjust trimming height, push in the
locking plate tab and move trimmer
head up or down to desired position.
2. Release tab and be sure head is
locked into one of the six (6) height
positions.
Locking
Plate Tab
Adjustable
Trimmer
Head