


4
ASSEMBLY
Read these instructions and this manual in
its entirety before you attempt to assemble
or operate your new trimmer.
IMPORTANT: This trimmer is shipped
WITHOUT OIL OR GASOLINE in the
engine.
Your new trimmer has been as sem bled
at the factory with the exception of those
parts left unassembled for shipping
purposes. All parts such as nuts, wash-
ers, bolts, etc., nec es sary to complete the
as sem bly have been placed in the parts
bag. To ensure safe and proper operation
of your trimmer, all parts and hard ware
you assemble must be tightened securely.
Use the correct tools as necessary to
ensure proper tightness.
TO REMOVE TRIMMER FROM
CAR TON
1. Remove loose parts included with trim-
mer.
2. Cut down two end corners of carton
and lay end panel down fl at.
3. Remove all packing materials.
4. Roll trimmer out of carton and check
carton thor ough ly for additional loose
parts.
WARNING: In order to prevent ac-
ci den tal starting when setting up, trans-
port ing, ad just ing or making repairs,
always dis con nect spark plug wire and
place wire where it can not contact spark
plug.
CAUTION: Muffl er and other engine
parts become extremely hot during
operation and remain hot after engine
has stopped. To avoid severe burns on
contact, stay away from these areas.
WARNING: Engine exhaust, some of its
constituents, and certain vehicle com po -
nents contain or emit chem i cals known to
the State of Cal i for nia to cause can cer and
birth defects or oth er re pro duc tive harm.
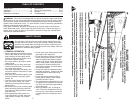
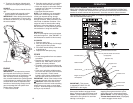
HOW TO SET UP YOUR TRIMMER
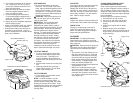
TO UNFOLD HANDLE
IMPORTANT: Unfold handle carefully so
as not to pinch or damage control cables.
1. Loosen handle knobs enough to allow
upper handle to be unfolded from the
shipping position.
2. Raise upper handle section into place
on lower handle and tighten handle
knob.
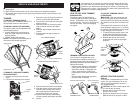
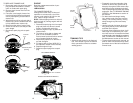
3. Remove handle padding holding trim-
mer head control bar to upper handle.
22" MODELS ONLY: Your trimmer handle
can be adjusted for your trimming com-
fort. Refer to “ADJUST HANDLE” in the
Service and Adjustments section of this
manual.
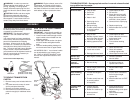
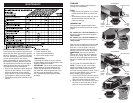
Bottle of oil
Trimmer Lines
(2) Sets
Loose Parts Packed Separately
(0.130 dia. x 16.75" long)
(0.155 dia. x 18.75" long)
LIFT UP
Lower
handle
Upper handle
Handle
knob
17
Does not start 1. Dirty air fi lter. 1. Clean/replace air fi lter.
2. Out of fuel. 2. Fill fuel tank.
3. Stale fuel. 3. Empty fuel tank and refi ll
with fresh, clean gasoline.
4. Water in fuel. 4. Empty fuel tank and refi ll
with fresh, clean gasoline.
5. Spark plug wire is 5. Connect wire to spark plug.
disconnected.
6. Bad spark plug. 6. Replace spark plug.
7. Throttle control lever not 7. Move throttle lever to FAST
in correct position position.
(if equipped).
Loss of power 1. Dirty air fi lter. 1. Clean/replace air fi lter.
2. Buildup of grass, leaves, 2. Clean underside of trimmer
and trash under trimmer. and trimmer head.
3. Too much oil in engine. 3. Check oil level.
4. Walking speed too fast. 4. Trim at slower walking
speed.
Excessive 1. Lines uneven or broken. 1. Check trimmer lines.
Vibration 2. Loose nuts or bolts. 2. Check all hardware,
including engine bolts.
3. Damaged trimmer head. 3. Check/repair trimmer head.
Starter rope 1. Bent engine crankshaft. 1. Contact a qualifi ed
hard to pull service center.
Loss of 1. Belt not driving. 1. Put belt on pulleys or
head drive replace belt if broken.
Hard to push 1. Handle height position not 1. Adjust handle height
right for you. to suit.
Poor trimming 1. Trimmer line length is 1. If line is worn or broken to
performance too short. half of original length,
replace line.
2. Throttle control lever not 2. Move throttle lever to FAST
in correct position position.
(if equipped).
Trimmer head 1. Trimmer line not 1. Follow instructions in
does not properly installed. Maintenance section.
retain line 2. Broken line retainer clip. 2. Replace string carrier plate
assembly.
3. Incorrect size of 3. Use correct diameter
trimmer line. trimmer line.
PROBLEM CAUSE CORRECTION
TROUBLESHOOTING - See appropriate section in manual unless directed
to a qualifi ed service center.