


10
TO LOCK the trigger switch “ON”, squeeze the trigger as far as it will go,
push in the lock button and release the trigger.
TO UNLOCK the lock button, squeeze the trigger and release, leaving the
lock button free to spring out.
NOTE: The lock button can be engaged only when the drill is running at
maximum speed.
Never use the lock button when a sudden stop may be
possible.
4. VARIABLE SPEED – As the trigger switch is squeezed, the speed
increases.
HOW TO USE SHEAR
Model 6603:
Firmly support and clamp the workpiece to ensure control. Place the side
knives of the shear slightly on the edge of the top side of the workpiece to
steady the tool. Squeeze the trigger switch and guide the shear into the
work. The tool cuts freely with only slight pressure. Forcing the tool will not
make it cut faster. Always use sharp cutters. A light coat of suitable cutting
fluid applied along the line of cut will increase the cutter life.
You can produce a cut-out within the perimeter of the workpiece by drilling a
1/2" diameter starting hole and following the directions above.
Model 6605.
Firmly support and clamp the workpiece to ensure control.
Position the workpiece with the hidden or back surface of
the material facing up to reduce marring of the exposed side. To achieve
maximum cutting efficiency, hold the bottom of stationary blades parallel to
and against the workpiece.
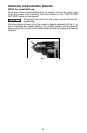
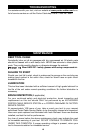
REPLACING CUTTERS
REMOVING CUTTER BLADES
1. Remove the shear head from the
motor unit. Loosen three cap screws
(A) Fig. 3 and pull the cutter head
forward (a light twisting motion may
be helpful) to separate it from motor
unit.
2. Remove the three cap screws (A)
from the shear housing. Retain the
spacer bushing (C) with the middle
cap screw).
3. Remove the center blade by gently
tapping it rearward. Retain the
spacer bushing (C) removed from the
hole in the center blade).
4. The side knives (D) and (E) will drop
out of the shear housing.
Fig. 3
A
B
C
F
D
E
DISCONNECT TOOL
FROM POWER SOURCE.
C