


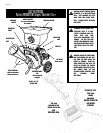
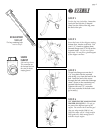
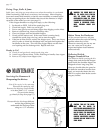
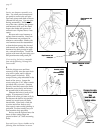

HEX HEADCAP SCREW,
5/16-18 x 3.25”
The bag retaining bolt
used in Step 3.
SERRATED
FLANGENUT
Side and top views.
The serrations on
the bottom bite into
the steel for better
staying power.
page 8
❷ ASSEMBLY
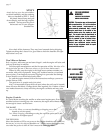
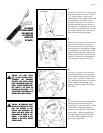
STEP 1
Put the leg into its holder. Insert the
lynch pin and clip the U-shaped
clasp over the front of the leg, onto
the end of the pin.
STEP 2
Insert the base of the chipper casting,
bottom first, into the oval hole. Use
your 1/2” wrench to tighten three
serrated flange nuts (5/16-18) on the
exposed studs.
Do not over-tighten
these nuts. Do not file or grind any part
of the chipper cone base.
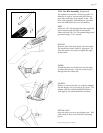
STEP 3
Thread one flange nut onto the 3-
1/4” long bolt with the serrated
side facing
away from the head of the
bolt. Insert the end of the screw
through the hole under the discharge
chute. Screw on the remaining nut,
serrated side facing
in this time.
Tighten with one 1/2” wrenches.
(Use two wrenches if the bolt won’t
go in easily.)
STEP 4
SEE YOUR ENGINE MANUAL FOR
PROPER OIL LEVELS. Oil and gas
are poured into different parts of the
engine. Do not mix the oil and the gas!
Also, use only straight 30W oil, not
10W-30 or other car oil. Only straight
30W grade oil is thick enough for use
with this 4-cycle engine.