


6
EN
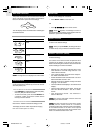
SENSOR DATA TRANSMISSION
Data is sent from the sensor(s) every 60 Seconds. The
reception icon shown in the Outdoor Temperature Area
indicates the status.
NOTE
SELECT SENSOR CHANNEL
Press CHANNEL on the main unit, to switch between
sensors 1-5.
The house icon shows the selected remote sensor.
To auto-scan between sensors, press and hold
CHANNEL for 2 seconds. Each sensor's data will be
displayed for 3 seconds.
To end auto-scan, press CHANNEL or MEMORY.
SEARCH FOR SENSOR
To search for a Thermo sensor, simultaneously press
and hold CHANNEL and MEMORY for 2 seconds.
If the sensor is still not found, check the
batteries.
CLOCK AND CALENDAR
This product tracks the time and date based on radio-
controlled signals from the RTHR328N remote sensor,
or manual settings that you enter.
RADIO-CONTROLLED CLOCK
The time and date are automatically updated by radio-
controlled clock signals from official time-keeping
organizations in Frankfurt (Germany) and Rugby
(England) unless you disable this feature. The signals
are collected by the remote sensor (RTHR328N)
whenever it is within 1500 km (932 miles) of a signal.
Initial reception takes 2-10 minutes, and is initiated when
you first set up the unit, and whenever you press RESET.
Once complete, the reception icon will stop blinking.
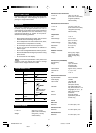
The reception icon
shown in the Clock Area
indicates 2 factors:
• Connection between the main unit and the sensor
that collects RF signals (
)
• RF signal reception (
)
How these signals work together:
To force a manual search for the RF clock
reception, press and hold SEARCH on the sensor
(RTHR328N).
TURN RADIO-CONTROLLED CLOCK ON / OFF
If you wish to manually set the clock, you must first
disable the radio-controlled feature. To do this, make
sure you are not in Setting Mode, then press and hold
DOWN on the main unit for 2 seconds. To enable it,
hold UP for 2 seconds.
• When the RF clock is enabled this icon
will
appear on the display.
• When the RF clock is disabled this icon
will
NOT appear on the display.
SET CLOCK
You only need to do this if you have disabled the radio-
controlled clock, or if you are too far from a RF signal.
1. Press and hold MODE / LIGHT for 2 seconds to enter
Setting Mode.
2. The setting will blink to indicate it can now be changed.
3. Press UP or DOWN to change the setting.
4. Press MODE / LIGHT to confirm the setting and
move to the next one. The order of the settings is:
time zone hour offset (+ / -23 hours), 12 / 24 hour
format, hour, minute, year, date / month format,
month, date, display language and hourly chime
(ON / OFF).
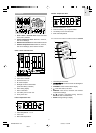
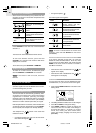
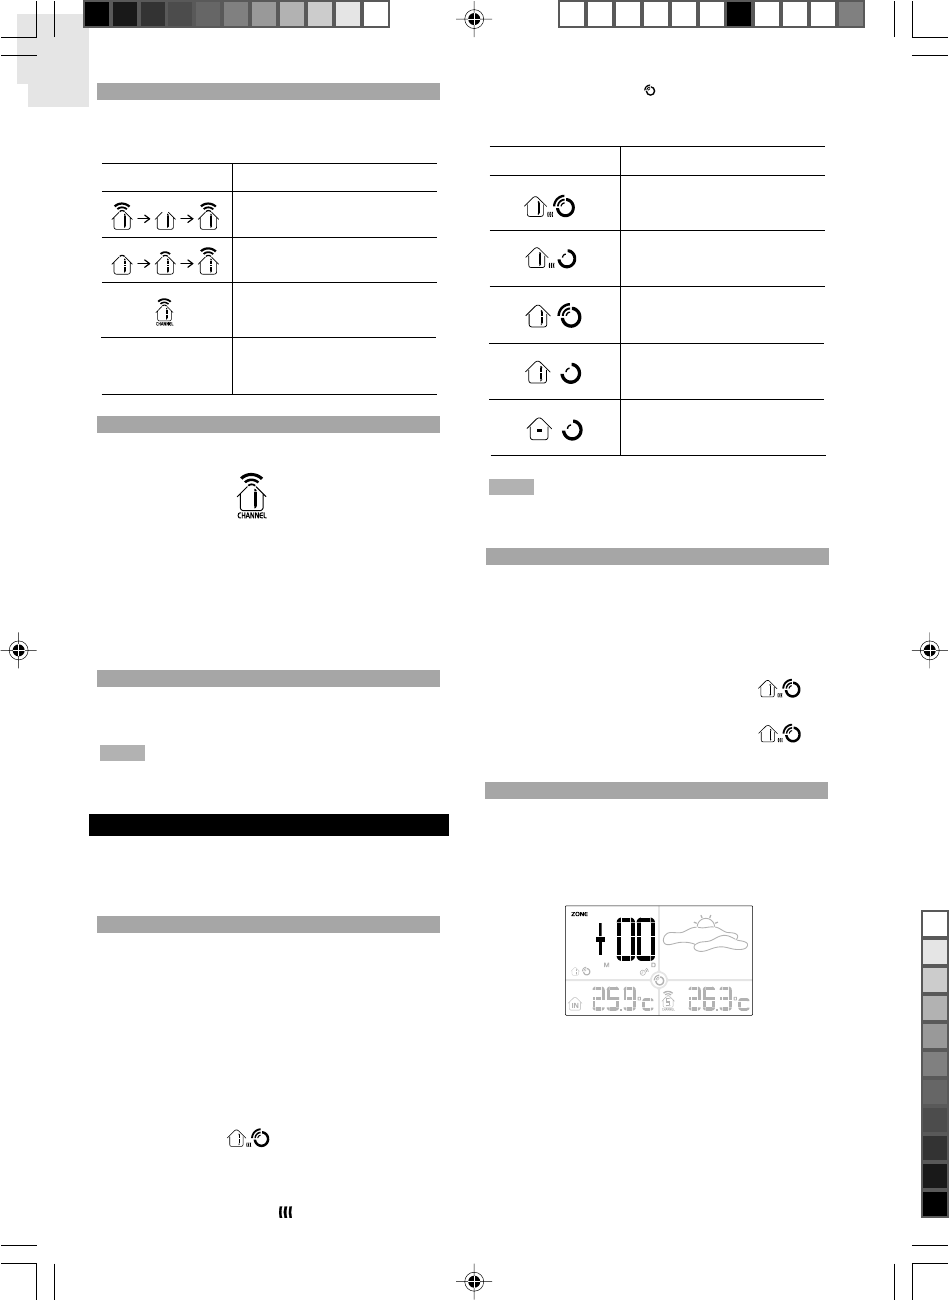
Main unit is searching for
sensors.
At least 1 channel has been
found.
Sensor 1 is sending data. (The
number shows which sensor is
selected.)
The selected sensor cannot be
found. Search for the sensor or
check batteries.
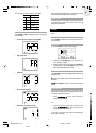
ICON DESCRIPTION
--- shows in Temp
Area
ICON MEANING
The unit has contact with the
remote sensor and has
synchronized the time.
The unit has contact with the
remote sensor but the time has
not been synchronized.
The unit has lost contact with
the remote sensor but the time
is synchronized.
The unit has lost contact with
the remote sensor and the time
is not synchronized.
The unit cannot reach the
remote sensor.
NOTE
BAR289 ENG R7 OP 8/20/04, 11:00 PM6
Black