


MACRO range installation manual. Issue 6
Page 24
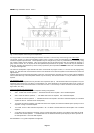
FUSES
Fuses for the protection of both the AC and DC supplies are located on the rear panel.
Certain fuses are contained within the chassis of MACRO equipment rather than on accessible front/rear panels:
(A) F1A pre-amplifier DC fuse on the pre-amplifier stabiliser module
(B) F1A auxiliary DC fuse on the pre-amplifier stabiliser module
(C) Special fusible link on the power output module
See APPENDIX D and APPENDIX E for identification.
Failure of the top fuse (a) could indicate a problem in the stabiliser module or within the subsequent mixer circuitry. The lower fuse
(b) protects the Auxiliary +24V DC output (pin 12 of the D connector). It is rated at 1 Amp and if this supply is used to source
current for the priority current sinks transistors, then these may have been damaged by the overload. These sinks are located on
each priority module.
The failure of fuse (c) would indicate that the power output module has been seriously damaged. Output transistors and associated
driver transistors may have failed, so simple fuse replacement is therefore inadvisable.
If a fuse blows repeatedly, a fault is indicated. Do not attempt to force the amplifier by fitting larger fuses. All standard fuses
should be replaced as a matter of routine every year if in regular use.
When replacing fuses, disconnect the mains supply and allow a few minutes for capacitors to discharge.
REPAIRS AND MAINTENANCE
Should components be required for replacement purposes, these may be obtained without delay from the address on the cover of
this manual. It would be preferable to use original specification components rather than improvise or modify the amplifier.
The MACRO range of amplification has been planned so that servicing and maintenance is extremely uncomplicated. All main
potential sources of failure are either pluggable or accessible from the top of the main circuit board. It is unlikely that the main
board will ever need to be removed except for the removal of spilled liquid, or broken mechanical parts. The following information
is a procedural guide for the most likely problems.
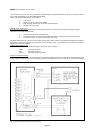
Free standing case removal
Free standing cased amplifiers are dispatched with the case fitted and to make any internal adjustments or module changes it will
be necessary to remove it. Turn the amplifier upside-down on a clean soft surface to avoid scratching and remove the four outer
cross-point headed screws. Revert the amplifier and using strong finger pressure, push out the bottom flanges at both sides of the
case, and slide it upwards over the chassis. Replacement is a reversal of this process. Line up the holes in case and chassis
before attempting to re-fit the screws. Use the correct size of screwdriver.
The case is manufactured from PVC clad aluminium and therefore, whilst being washable it will not withstand any direct heat, i.e.
cigarettes, soldering irons etc.
Removal of main pre-amplification circuit board
Remove the gain control knobs and associated spindles by pulling firmly. Remove all the modules. Spring in the 8 plastic support
pillars, spaced along the board. By lifting the rear edge of the board it will now be possible to push to board backwards and
upwards giving access to the bottom of this board. De-solder the signal cableform if complete access is required.
WARRANTY
This amplifier should operate successfully for many years if installed correctly. However, should any fault occur within 24 months
of installation, irrespective of usage or application, the manufacturer undertakes to replace parts, or the whole unit, at their
discretion, free of all labour or parts charges. However, should investigation of such a fault indicate operation of the unit outside
its specification, then the manufacturer reserves the right to levy an appropriate repair charge.
Should a fault be suspected, your dealer should be notified in the first instance. All returns should be made via your dealer,
forward carriage paid, and be accompanied by details of:
a the reported symptoms
b brief details of the installation.
c details of the circumstances of failure
Following the routine warranty period, Mustang amplifiers may be returned via your dealer, to the manufacturer for any necessary
repairs or refurbishing. Details of the work required/reported fault must accompany the unit, and nominal charges will be levied.