


PAGE 20 — MOONLIGHT LIGHTING SYSTEM — OPERATION & PARTS MANUAL — REV. #0 (10/27/06)
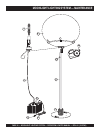
Figure 23. Inflating the Balloon
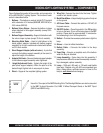
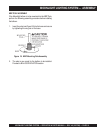
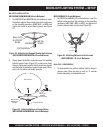
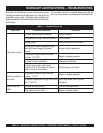
Figure 22. Installing the Lamp Fixture
3. Install the lamp fixture into the balloon. Do not force the
bulb against the PVC material as this may damage the
bulb. Set the snap ring (Figure 22) into the o-ring groove
to ensure a complete seal of the balloon.
MOONLIGHT LIGHTING SYSTEM — SETUP
CAUTION - READ MANUAL
Please read this entire manual carefully
before attempting to operate the
MOONLIGHT. Failure to read this
manual could cause damage to the
MOONLIGHT and serious injury to the operator.
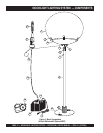
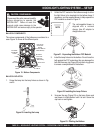
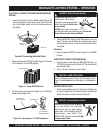
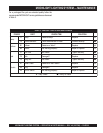
BALLOON COMPONENTS
The various components of the balloon are contained in a
case. Figure 19 shows all the different parts.
BALLOON INFLATION
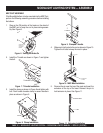
1. Screw the lamp into the lamp fixture as shown in Fig-
ure 20.
BALLOON
LAMP
LAMP
FIXTURE
BLOWER
BALLOON
SUPPORT
BASE
(EXCEPT MB150
AND MB400)
BLOWER
CHARGER
CORD
BALLAST
CABLE
BALLAST
(EXCEPT
MB1000W)
SNAP
RING
Figure 19. Balloon Components
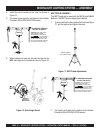
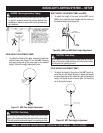
Figure 21. Expanding the Balloon PVC Material
Figure 20. Inserting the Lamp
2. Unfold the PVC material of the balloon enough to allow
the light fixture to be inserted into the balloon base. If
necessary, use the supplied blower to help expand the
PVC material as shown in Figure 21.
NOTE
The rechargeable blower is
shipped with a minimal
charge. Use AC adapter to
charge before use.
4. Unscrew the cap (Figure 23) on the lamp fixture and
use blower to inflate balloon until it is taut. Screw the
cap back on and tighten.