


10
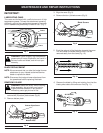
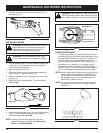
INSTALLING BLADE
WARNING: Blades are sharp. When handling
blade assembly, do not place your hand or
fingers between blades or in any position
where they could get pinched or cut.
WARNING: To prevent serious injury, wear
gloves when removing or installing the blade.
1. Slide the blade plate all the way forward towards the
yokes (Fig. 13). The red end of the bar should be
covered by the blade plate.
2. Align the cams (see Fig. 9).
3. Place new blade into the housing and squeeze the
yoke to drop it into place (see Fig. 12).
4. Rotate the blade so that it drops past the lower cam
(see Fig. 11).
5. Install the four (4) blade screws. Torque screws to
10-15 in•lbs.
7. Squeeze the yokes and remove the blade from the
housing (Fig. 12).
6. Install the bottom plate lip into the slot of the housing
(Fig. 14). Install the two (2) bottom plate screws.
Torque screws to 10-15 in•lbs.
NOTE: If binding occurs after replacing the blade
assembly, repeat the steps under Removing
Blade and Installing Blade.
LUBRICATING BLADE
1. For easier operation and longer blade life, lubricate
the hedge trimmer attachment blade before and after
each use. Before lubricating, be sure the switch is in
the OFF position on the powerhead. Apply light
machine oil along the edge of the top strap (Fig. 15).
2. Occasionally, you should oil your hedge trimmer
attachment during use. Before oiling, stop hedge
trimmer, then oil. You then can resume trimming. Do
not oil while hedge trimmer attachment is running.
NOTE: Avoid using solvents when cleaning plastic parts.
Most plastics are susceptible to damage from
various types of commercial solvents, and may
be damaged by their use. Use clean cloths to
remove dirt, carbon dust, etc.
NOTE: Only the parts shown on the parts list, page 9,
are intended to be repaired or replaced by the
customer.
Bottom Plate Lip
Housing Slot
MAINTENANCE AND REPAIR INSTRUCTIONS
Fig. 12
Fig. 13
WARNING: When servicing, use only identical
OEM replacement parts. Use of any other parts
may create a hazard or cause product damage.
Fig. 14
Fig. 15