


1211
MAINTENANCE INSTRUCTIONS
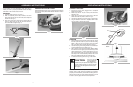
6. Lock the ends of the line in opposite slots on the spool
(Fig. 16). Place the clear plastic line retainer back over
the line and spool (Fig.
17). Pull the lower line up into
the lo
wer slot in the clear plastic line retainer (Fig. 18).
Pull the upper line down into the upper slot (Fig. 19).
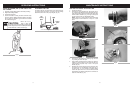
7. Insert the line through each eyelet in the spool carrier
and slide the spool into the carrier. (Fig. 20)
NOTE: Ensure that the line is within the clear plastic
line retainer. If it's outside of the clear plastic line
retainer, the line will not feed.
8. Make sure to insert the spring, assemble the spool
and spool carrier back onto the trimmer. To do so,
push the head on and turn it clockwise until it locks.
(Fig. 21 and Fig. 22)
Fig. 16
Fig. 17
Fig. 18
Fig. 19
Fig. 20
Fig. 21
Fig. 22
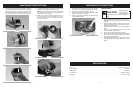
9. To test if the line is advancing properly, push the but-
ton with your thumb while pulling the line with your fin-
gers
. The line should advance freely. (Fig. 23).
10. In the event of the line breaking inside the spool,
repeat the replacement operation.
11. Start the grass trimmer following the instructions in
the “STARTING” section.
MAINTENANCE
1. Regular cleaning and maintenance of your string trim-
mer will ensure efficiency and prolong the life of your
machine.
2. After each cutting operation, take apart and clean out
the grass and soil from: the spool and its slot and in
particular the debris shield.
3. During operation, keep the air slots clean and free of
grass.
4. Only use a cloth soaked with hot water and a soft
br
ush to clean the string trimmer.
5. Do not spray or wet the appliance with water.
6. Do not use detergents or solvents as these could ruin
the trimmer. The parts made of plastic can easily be
damaged by chemical agents.
7. If the line cutting blade no longer cuts or breaks, have
this replaced by contacting an authorized service
center.
MAINTENANCE INSTRUCTIONS
Fig. 23
Bef
ore carrying out
any maintenance
operations, cut off the electric power supply by
disconnecting the plug from the extension
cord.
CAUTION:
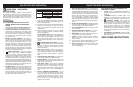
Input
. . . . . . . . . . . . . . . . . . . . . . . . . . . . . . . . . . . . . . . . . . . . . . . . . . . . . . . . . . . . . . . . . . . . . . . . . . . . .
120V~, 60Hz, 2.2 Amp
No Load Speed . . . . . . . . . . . . . . . . . . . . . . . . . . . . . . . . . . . . . . . . . . . . . . . . . . . . . . . . . . . . . . . . . . . . . . . . . . . . .10,000/min.
Cutting width . . . . . . . . . . . . . . . . . . . . . . . . . . . . . . . . . . . . . . . . . . . . . . . . . . . . . . . . . . . . . . . . . . . . . . . . . . . . . . .9” (225mm)
Line Diameter . . . . . . . . . . . . . . . . . . . . . . . . . . . . . . . . . . . . . . . . . . . . . . . . . . . . . . . . . . . . . . . . . . . . . . . . .ø0.065” (1.65mm)
Net
W
eight . . . . . . . . . . . . . . . . . . . . . . . . . . . . . . . . . . . . . . . . . . . . . . . . . . . . . . . . . . . . . . . . . . . . . . . . . . . .3.52 Lbs (1.6 Kg)
SPECIFICATION