


18 Section 5— operation
Mulching (if so equipped)
Select models come equipped with a mulch kit which
incorporates special blades, already standard on the tractor, in a
process of recirculating grass clippings repeatedly beneath the
cutting deck. The ultra-fine clippings are then forced back into
the lawn where they act as a natural fertilizer.
Observe the following points for the best results when mulching:
• Never attempt to mulch if the lawn is damp. Wet grass
tends to stick to the underside of the cutting deck
preventing proper mulching of the clippings.
• Do NOT attempt to mulch more than 1/3 the total height of
the grass or approximately 1-1/2 inches. Doing so will cause
the clippings to clump up beneath the deck and not be
mulched effectively.
• Maintain a slow ground speed to allow the grass clippings
more time to effectively be mulched.
• Always position the throttle control lever in the FAST
(rabbit) position and allow it to remain there while mowing.
Failing to keep the engine at full throttle places strain
on the tractor’s engine and does not allow the blades to
properly mulch grass.
NOTE: It is not necessary to remove the discharge chute to
operate the mower with the mulch kit installed.
WARNING! Never operate the mower without the
discharge chute properly attached.
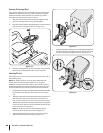
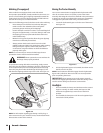
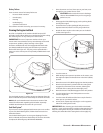
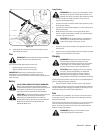
To operate the cutting deck without mulching, simply remove
the mulch plug by raising the discharge chute (A), unhooking the
chute strap from the pin on the cutting deck (B) and removing
the mulch plug from under the discharge chute hinge (C). This
will allow the clippings to discharge out the side. See Figure 5-2.
A
C
B
Figure 5-2
NOTE: For information regarding purchasing a mulch plug, or
other accessories for your model of tractor, see the Attachments
& Accessories section of this manual.
Moving The Tractor Manually
Your tractor’s transmission is equipped with a hydrostatic relief
valve for occasions when it is necessary to move the tractor
manually. Activating this valve forces the fluid in the transmission
to bypass its normal route, allowing the rear tires to “freewheel.”
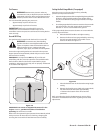
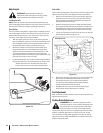
To engage the hydrostatic relief valve, proceed as follows:
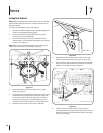
1. Locate the hydrostatic bypass rod in the rear of the tractor.
See Figure 5-3.
Figure 5-3
2. Pull the hydrostatic bypass rod outward, then down and to
the left, to lock it in place.
NOTE: The transmission will NOT engage when the hydrostatic
bypass rod is pulled out. Return the rod to its normal position
prior to operating the tractor.
IMPORTANT: Never attempt to move the tractor manually
without first engaging the hydrostatic relief valve. Doing so will
result in serious damage to the tractor’s transmission.
Headlights
• On some models, the lamps are ON whenever the tractor’s
engine is running. On other models, the lamps are ON
whenever the ignition key is moved out of the STOP
position.
• On all models, the lamps turn OFF when the ignition key is
moved to the STOP position.
18 Section 5— operation