


Operating instructions – Scarifier with electric motor English
7
Operating times
Follow the national/ municipal
regulations with respect to times
of usage (if required ask your local
authority).
Directions
Details of specific locations on the lawn
scarifier (e g. left, right) are always
quoted as seen from the steering
handle and while facing forward.
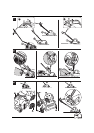
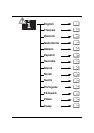
1. Hang the grass catcher
(optional, depending on model)
Figure 2
Lift up the deflector flap and hook
the grass sack onto the lawn
scarifier.
2. Setting the depth of cut
`~ìíáçå
råáíë=ïáíÜ=ÇÉí~ÅÜ~ÄäÉ=ïÜÉÉäë
cáÖìêÉ=P~LÄ
qÜÉ=ïçêâáåÖ=ÇÉéíÜ=ãìëí=ÄÉ=ëÉí=
ÅçêêÉÅíäó=ÄÉÑçêÉ=íÜÉ=ìåáí=áë=ìëÉÇ=
Ñçê íÜÉ=Ñáêëí=íáãÉK=tÜÉå=~ëëÉãÄäáåÖ=
íÜÉ=ïÜÉÉäë=E^FI=ÉåëìêÉ=íÜ~í=íÜÉó=~êÉ=
~ëëÉãÄäÉÇ=áå=íÜÉ=ÅçêêÉÅí=éçëáíáçå=
Ñçê íÜÉ=ïçêâáåÖ=ÇÉéíÜ=ëÉííáåÖK=
tçêâáåÖ=ÇÉéíÜ=ëÉííáåÖ=ïÜÉå=ìëáåÖ=
íÜÉ=ìåáí=Ñçê=íÜÉ=Ñáêëí=íáãÉ=áë=éçëáíáçå=N=
çÑ=íÜÉ=ïÜÉÉä=~ëëÉãÄäóK
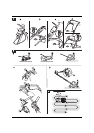
råáíë=ïáíÜ=ÜÉáÖÜí=~ÇàìëíãÉåí=äÉîÉê
cáÖìêÉ=PÅ
qÜÉ=ïçêâáåÖ=ÇÉéíÜ=ãìëí=ÄÉ=ëÉí=
ÅçêêÉÅíäó=ÄÉÑçêÉ=íÜÉ=ìåáí=áë=ìëÉÇ=Ñçê=
íÜÉ=Ñáêëí=íáãÉK=qÜÉ=ÜÉáÖÜí=~ÇàìëíãÉåí=
äÉîÉê=ã~ó=ÄÉ=ãçîÉÇ=íç=íÜÉ=Ñáêëí=
ïçêâáåÖ=ÇÉéíÜ=ëÉííáåÖ=çåäó=E_I=Ñáêëí=
åçíÅÜFK
Information on all types
Wear on the blades will make it
necessary to re-adjust the depth
of cut at a later date. An optimum
working depth is obtained when
the blades of the cutter are inserted
2–3 mm into the ground.
If the working depth is too deep,
this can overload the scarifier and
cause damage. Ensure that the
depth of cut setting is correct.
Figure 3a/b
Unscrew wheels (A) and move
to the appropriate height setting.
Screw on wheels tightly.
or
Figure 3c
Set height adjustment lever
(depending on model) according
to the wear on the blades.
Settings C, D, E are not required
until the blades are worn.
Depending on the degree of wear,
gradually set the blades lower,
starting at C.
3. Power cord
Figure 4
Attach power cord to the cord
grip.
First plug the mains plug into the
switch/plug combination on the
unit and then into a 230 V socket.
4. Starting the engine
a~åÖÉê
hÉÉé=Ü~åÇë=~åÇ=ÑÉÉí=ïÉää=~ï~ó=Ñêçã=
íÜÉ=ÅìííáåÖ=Ää~ÇÉK
Figure 5
Keep the appliance on an even
surface with little or the shortest
possible grass.
Tilt the unit backwards slightly
until the front wheels are off the
ground (Fig. 5a) or move the
height adjustment lever to position
A to prevent the blade shaft from
touching the ground (Fig. 5b).
Press and hold down the locking
button (Fig. 5c).
Pull and hold the switch lever,
release the locking button
(Fig. 5c).
Slowly lower the front of the unit
until the front wheels are touching
the ground again or move the
height adjustment lever (depen-
ding on model) forwards to the
first working depth setting (B,
first notch) (Fig. 5b).
Note
When the cutter deck is in contact
with the ground, the unit can move.
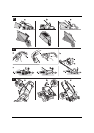
5. Stopping the engine
Release switch lever (Fig. 8a).
The motor and the cutter deck stop
after a short time.
6. Scarification
Figure 6
Start the engine as indicated.
Push the scarifier along parallel
strips of the lawn.
Place the power cord in large
loops on the ground.
7. Detaching and
emptying the grass sack
(Optional, depending on
model)
Figure 7
Release switch lever and wait until
the motor stops.
Lift the deflector flap and unhook
the grass sack.
Empty out the contents.
8. Working without
the grass sack
Whenever you detach the grass
sack, the deflector flap drops down.
When scarifying without the grass
sack attached, the cuttings are
ejected straight onto the ground.
9. After finishing work
Stopping the engine.
Pull the mains plug out of the unit
and the socket.
Empty grass catcher.
Leave the motor to cool down
(approx. 30 minutes) before
cleaning, servicing, storing or
shutting down the unit.
About aeration
In order that a healthy lawn can
develop in the spring, it is necessary
for greater amounts of air to pene-
trate the area around the roots of the
grass. During this period the lawn
must be scarified more frequently
than in the summer.
!