


10
• Check engine oil level before each use as
instructed in the separate engine manual packed
with your unit. Read and follow instructions
carefully.
• Clean air cleaner every 25 hours under normal
conditions or once a season. Clean every few hours
under extremely dusty conditions. To service the air
cleaner, refer to the separate engine manual
packed with your unit.
• The spark plug should be cleaned and the gap
reset once a season. Check engine manual for
correct plug type and gap specifications.
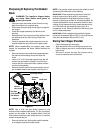
Removing The Flail Screen
If the discharge area becomes clogged, remove the flail
screen and clean area as follows:
• Stop the engine and make certain the chipper
shredder has come to a complete stop.
• Disconnect spark plug wire from spark plug and
ground against the engine.
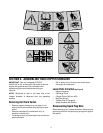
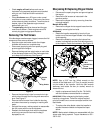
• Remove the bag and two wing knobs on each side
of the discharge chute and lift the discharge chute
up to keep it out of the way. See Figure 9.
Figure 9
• Remove the two hairpin clips from each clevis pin
which extend through the housing and remove the
pins. See Figure 9.
• Remove the flail screen from inside the housing
and clean the screen by scraping or washing with
water.
• Reinstall the screen, making certain to reassemble
the flail screen with the curve side down.
• Reattach the discharge chute with the hardware
previously removed and connect the bag (if
equipped) to unit.
Sharpening Or Replacing Chipper Blades
• Disconnect the spark plug wire and ground against
the engine.
• Remove the flail screen as instructed in the
previous section.
• Remove the chipper chute by removing three hex
nuts and washers.
Models 462 or 465
• Remove the chipper chute support brace from the
frame by removing the hex bolts.
All Models
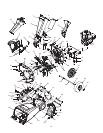
• Rotate the impeller assembly by hand until you
locate one of the two chipper blades in the chipper
chute opening.
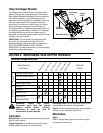
• Remove the blade by removing the internal hex
screws, lock washers and hex nuts which secure it
to the impeller. Retain the hardware. See Figure 10.
Figure 10
NOTE: Use a 3/16” hex key (Allen) wrench on the
outside of the blade and a 1/2” box (or socket) wrench
on the inside of the impeller. Hold the Allen wrench
stationary and rotate the box (or socket) wrench to
loosen the nut.
• Install a replacement blade (Part No. 781-0490)
with the hardware removed earlier or sharpen.
IMPORTANT:
When sharpening the blade, protect
hands by using gloves. Follow the original angle of
grind and make sure to remove an equal amount from
each blade.
• To replace the other blade, rotate the impeller to
expose the second blade and repeat the steps
above.
NOTE: Make certain blades are reassembled with the
sharp edge facing upward. Torque hardware to 250 -
300 in. lbs.
Discharge
Chute
Hairpin
Clips
Wing Knobs
Internal Hex
Impeller
Lock Washer
& Nut
Screw
Chipper Blade