


6
3
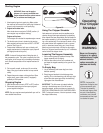
Setting Up
Your Chipper
Shredder
IMPORTANT: This unit is shipped without gasoline or oil
in the engine. Be certain to service engine with gasoline
and oil as instructed in the separate engine manual
before operating your machine.
Loose Parts In Carton
a. Hopper Assembly d. Bag
b. Chute Deflector e. Safety Glasses
c. Chipper Chute f. Engine Oil
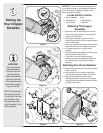
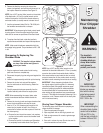
Attaching The Hopper
Assembly
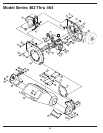
1. a. Remove six hex nuts and washers from the weld
studs on the impeller housing. Do not remove the
support plate. See Figure 1.
b. Place hopper assembly into position in front of
impeller housing, aligning holes in hopper assembly
collar with weld studs.
c. Slide hopper assembly onto weld studs and replace
washers and hex nuts. Do not tighten completely.
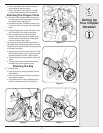
2. a. Lift hopper assembly up to impeller bracket
assembly.
b. Slide the release rod out slightly to hook the hopper
bracket onto the rod. See Figure 2.
c. Tighten the six hex nuts that secure hopper
assembly to impeller housing and also tighten the
hex nuts that secure hopper bracket to hopper
assembly.
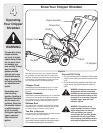
Attaching The Chute Deflector
3. a. Remove the wing knobs from each side of the lower
impeller housing.
b. Remove the hex lock nut, spacers, and hex bolt
from the top of the impeller housing. See Figure 3.
4. a. Align the chute deflector in position on the
discharge opening and insert hex bolt with spacer
through hinge on chute deflector (spacers fit inside
of hinges). See Figure 4.
Figure 3
Figure 2
NOTE: All references in
this manual to the left
or right side of the chip-
per shredder is from
the operating position
only. Exceptions, if any,
will be specified.
Figure 1
IMPORTANT
This unit is shipped
without gasoline or
oil in the engine. Be
certain to service
engine with gasoline
and oil as instructed
in the separate engine
manual before operat-
ing your machine.
Figure 4