


10
• Allow the auger to remain engaged for
approximately ten (10) seconds before releasing
the auger control. Repeat this several times.
• With the engine running in the FAST position and
the auger control in the disengaged “up” position,
walk to the front of the machine.
• Confirm that the auger has completely stopped
rotating and shows NO signs of motion.
IMPORTANT:
If the auger shows ANY signs of rotating,
immediately return to the operator’s position and shut
off the engine. Wait for all moving parts to stop before
readjusting the auger control cable as shown in the
“Making Adjustments” on page 10.
Clearing The Snow
CAUTION: Check the area to be cleared for foreign
objects. Remove, if any.
• Start the engine following starting instructions.
• Allow the engine to warm up for a few minutes as
the engine will not develop full power until it
reaches operating temperature.
• Rotate the chute assembly to the desired direction,
away from bystanders and/or buildings.
• Making certain no bystanders or obstacles are in
front of the unit, squeeze the auger control
completely against the upper handle to fully engage
the augers.
• While the auger control is engaged, squeeze the
drive control completely against the upper handle
to engage the wheels. Do not “feather” the drive
control.
• As the snow thrower starts to move, maintain a firm
hold on the handle, and guide the snow thrower
along the path to be cleared.
• Release the auger and drive controls to stop the
snow throwing action and forward motion.
NOTE: Your unit is equipped with a clutch in the
transmission. If the wheels stop turning while trying to
discharge large volumes of snow, immediately
disengage the drive control and allow the rotating
augers to discharge snow from the housing. Reduce
the clearing width and continue operation.
• On each succeeding pass, readjust the chute
assembly to the desired position and slightly
overlap the previously cleared path.
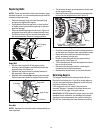
Operating Tips
• For most efficient snow removal, remove snow
immediately after it falls.
• Discharge snow downwind whenever possible.
Slightly overlap each previous swath.
• Set the skid shoes 1/4" below the shave plate for
normal usage. The skid shoes may be adjusted
upward for hard-packed snow.
NOTE: It is not recommended that you operate this
snow thrower on gravel as loose gravel can be easily
picked up and thrown by the auger causing personal
injury and/or damage to the snow thrower.
• If for some reason, you have to operate the snow
thrower on gravel, keep the skid shoe in the highest
position for maximum clearance between the
ground and the shave plate.
• Clean the snow thrower thoroughly after each use.
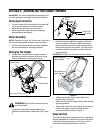
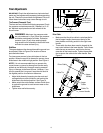
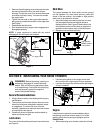
Cleaning The Chute Assembly
The clean-out tool is conveniently fastened to the rear
of the auger housing with a mounting clip.
When snow and ice collect in the chute assembly
during operation, use this tool to safely clean the chute
and chute opening. Follow the steps below to operate it.
• Release both auger and drive controls.
• Stop the engine by moving throttle lever to stop
position.
• Remove the clean-out tool from the clip which secures
it to the rear of the auger housing.
• Use the shovel-shaped end of the clean-out tool to
dislodge and scoop any snow and ice which has
formed in and near the chute assembly.
• Re-fasten the clean-out tool to the mounting clip on
the rear of the auger housing. You can start
operating your snow thrower now.
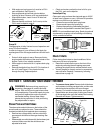
SECTION 5: MAKING ADJUSTMENTS
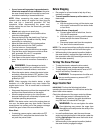
Auger Cable
Periodic adjustment to the auger control cable may be
required due to normal stretch and wear on the belt.
Adjustment is needed if the augers seem to hesitate while
turning, but the engine maintains speed, or continue turning
with the auger control disengaged.
WARNING: Stop engine by moving throttle
lever to stop position and wait for all moving
parts to stop before using the clean-out tool.
WARNING: Never use your hands to clean
snow and ice from the chute assembly or auger
housing.